General Services sub-tab
- 21 Oct 2024
- 7 Minutes to read
- Print
- DarkLight
- PDF
General Services sub-tab
- Updated on 21 Oct 2024
- 7 Minutes to read
- Print
- DarkLight
- PDF
Article summary
Did you find this summary helpful?
Thank you for your feedback
General security service settings are configured on this page. Because of this complexity, it is recommended to prepare a document that defines how the company security requirements are implemented with the device security settings.
Configure General Services
Go to Security :: Services :: General Services. Enter details:
In the ZPE Cloud section(cloud-based management platform for Nodegrid products):
Select Enable ZPE Cloud checkbox (Nodegrid NSR, GSR, BSR, LSR, HSR - default: enabled. Nodegrid Serial Console - default: disabled). When Once enabled you can access this device from the ZPE cloud.
ZPE Cloud URL: This is a read-only field, that automatically populates the URL to the ZPE cloud.
Enable Remote Access: Check this field to remotely access the device, this is useful when you want to take the backup of the data.
(optional) Enable File Protection: If enabled, file transfer requires an authentication hash based on this password to validate file integrity and origin. The field is disabled by default. If enabled, enter Passcode and Confirm Passcode.
Select Enable File Encryption checkbox (expands dialog)
On the File Encryption Mode menu (select one):
Encryption by Passcode radio button. Enter the Encryption Passcode and Confirm the Encryption Passcode.
Encryption by an Asymmetric Key radio button. Select Encryption with Base64 checkbox.
In the Active Services section (select all that apply):
Enable detection of USB devices: If enabled, detect if any USB is attached to the device.
Enable RPC: Enable if you want to request services from other programs on a different machine in a network.
Enable gRPC checkbox: If enabled, enter gRPC Port (default: 4830)
Enable FTP Service checkbox.
Enable SNMP Service checkbox (default: enabled)
Enable Telnet Service to Nodegrid checkbox (expands dialog). Enter Telnet TCP Port (default: 23).
Enable Telnet Service to Managed Devices checkbox.
Enable ICMP echo reply checkbox.
Enable ICMP secure redirects checkbox.
Enable USB over IP checkbox.
Enable Search Engine checkbox (expands dialog). Select the Enable Dashboards checkbox.
Enable Telegraf checkbox.
Enable Services Status Page (<NG URL>/services/status) used to determine functioning services.
Enable reboot on Services Status Page checkbox (allows device reboot on the /services/status page).
Enable the keepalived checkbox to enable a keepalive session for a Nodegrid device. Enabling this option ensures that the keepalive session starts during the system reboot and remains active throughout the session. With the option enabled, the keepalived settings can also be exported and imported along with the other Nodegrid configurations.
You can also enable the keepalived setting via the CLI by entering the following command:
[admin@nodegrid services]# set enable_keepalived=yesIn the Enable Virtualization Services section(select all that apply):
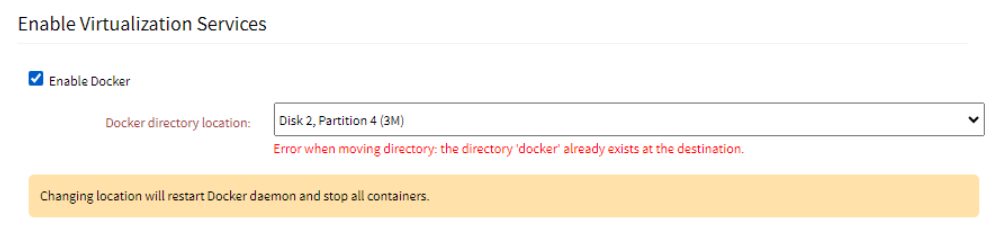
Enable Docker: When you enable the field, the Docker directory location drop-down list is displayed. It lists all the suitable locations to which the Docker daemon and its files can be moved and lists any disk or partition that is formatted and mounted. The Default option points to the primary disk location; /var/lib.
If there is not enough space in the selected folder, an error is displayed:
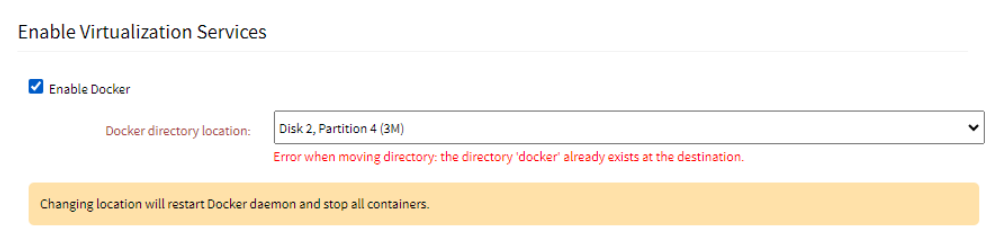
If there is an existing folder called Docker, an error is displayed:
Enable Qemu/KVM checkbox.
Enable VMware Manager checkbox.
Cluster TCP Port (default: 9966).
Enable Automatic Cluster Enrollment checkbox.
Search Engine TCP Port (default: 9300).
Enable Search Engine High Level Cipher Suite checkbox.
VM Serial Port (default: 9977)
vMotion timeout [seconds] (default: 300)
Enable VM Serial access checkbox (default: enabled).
Enable Zero Touch Provisioning checkbox (default: enabled).
Enable Bluetooth checkbox.
NOTE
(default: enabled) Completely enables/disables Bluetooth on the device. When enabled, tethers the network connection via Bluetooth to the device without any configuration. This tethers the network connection via Bluetooth to be the first device deployed on the network. This temporary connection reaches ZPE Cloud to download its full configuration.
Display name (Default format: <ProductName_SerialNumber> This name is displayed on other devices paired with this device via Bluetooth.
Enable Bluetooth Discoverable mode checkbox (default: Enabled).
NOTE
Enables discovery and pairing of this device to an external device. This tethers the network connection via Bluetooth to be the first device deployed on the network. This temporary connection reaches ZPE Cloud to download its full configuration. When a connection is established to a trusted device, this discoverable mode can be disabled to ensure other devices cannot pair with this device.
Enable PXE (Preboot eXecution Environment) checkbox (default: enabled).
Block Host with multiple authentication failures checkbox (expands dialog).
Period Host will stay blocked (min) (default: 10).
Enter Timeframe to monitor authentication fails (min) (default: 10).
The number of authentication fails to block the host (default: 5).
Whitelisted IP Addresses (comma-separated).
Block Account with multiple authentication failures: Enable this field if you want to lock the account when the credentials are entered incorrectly multiple times. If you enable the field enter the following details:
Period Account will stay blocked (min): The duration for which you want to keep the account locked out.
Timeframe to monitor authentication fails (min): the time frame for which the authentication failure is monitored.
Number of Authentication failed to block account: The account will be locked out after the specified number of attempts.
Show message when the account is blocked: If the account gets locked, a relevant message is displayed in the UI.
Enable Console Access: provides administrators the ability to control access to the primary console interface, which includes both the Console Serial Port and the Video VGA/HDMI and USB Keyboard ports.
To allow root console access, select both Enable console access and Allow root console access fields.
When you disable the console access:Critical system components such as Console Live system authentication, Bootloaders, and root console access are not accessible anymore.
BIOS settings are accessible, to make it inaccessible use the Password protected boot feature.
Unchecking Allow root console access disables access to the root users as well and they will encounter a login incorrect error message as shown in the following example.
nodegrid login: root

Login incorrect
nodegrid login: Event Notification from nodegrid. Reported on 2024-04-17T11:51:04z. Event ID 202: User authentication failed. User: root on 'ttyS0'.


System Console Events is turned off.
Note:
It's crucial to carefully consider the implications of disabling the main console port. This action may impact low-level maintenance tasks that necessitate direct access to the system. Make sure to evaluate your specific requirements for maintenance and security before disabling Console Access.
On the Managed Devices menu (select all that apply):
Device access is enforced via user group authorization checkbox (If enabled, users can only access devices listed in the user's authorization groups. If not enabled, all enrolled devices are available).
Enable the Autodiscovery checkbox. Select the DHCP lease controlled by the autodiscovery rules checkbox (default: disabled).
On FIPS 140-3 menu: (available in v5.8+)
Select the Enable FIPS 140-3 checkbox. Enabling FIPS 140-3 on a Nodegrid device ensures FIPS compliance, limiting cryptographic services to the FIPS provider for the applications that rely on OpenSSL for these services.
Network services and ports that rely on OpenSSL for cryptographic services will be FIPS 140-3 compliant when enabled, including:
HTTPS (TCP port 443)
SSH client and server (TCP port 22)
SNMP (TCP port 161)
Cluster (TCP port 9966)
For a more detailed list, refer to the FIPS 140-3 status page (Click on the FIPS 140-3 button on the top right of the web UI).
NOTE
Enabling or disabling FIPS 140-3 requires the Nodegrid device to be rebooted for all changes to take effect.
In the user interface, the Banner (right side) shows FIPS 140-3 is active.
Click the FIPS 140-3 button to display the status.

You may also verify that FIPS is enabled from the root shell using the following command:
root@nodegrid:~# openssl list -providers
Providers:
  base
    name: OpenSSL Base Provider
    version: 3.0.12
    status: active
  fips
    name: OpenSSL FIPS Provider
    version: 3.0.10
    status: active
On the SSH menu:
Select SSH allow root access checkbox (default: disabled).
Enter SSH TCP Port (default: 22).
Enter SSH Ciphers (comma-separated) (default: blank).
Enter SSH MACs (comma-separated) (default: blank).
Enter SSH Kex Algorithms (comma-separated) (default: blank).
On the Web Service menu:
Select Enable HTTP access checkbox (default: enabled). Enter HTTP Port (default: 80).
Select Enable HTTPS access checkbox (default: enabled).
Enter HTTP Port (default: 443).
Select Redirect HTTP to HTTPS checkbox (default: enabled).
Select the Enable HTTP/S File Repository checkbox (default: disabled).
NOTE:
When enabled, provide public access to files uploaded in the File Manager/datastore folder (to access the file publicly, use https://<Nodegrid URL>/datastore/<filename.ext>). For security reasons, the full path of the file is required. In addition, "list", "edit", and "post" commands are disabled.
You can enable access to the Web UI using the CLI. To do this, access the Console and run the following commands. This method is useful if a user gets locked out of the Web UI and when HTTP and HTTPS are disabled.
cd/settings/services
enable_http_access = yes
http_port = 80
enable_https_access = yes
http_port = 443
redirect_http_to_https = no
commit
On FRR menu, select as needed:
Enable BGP checkbox
Enable OSPFv2 checkbox
Enable OSPFv3 checkbox
Enable RIP checkbox
Enable VRRP checkbox
On Cryptographic Protocols menu, select as needed:
TLSv1.3 checkbox (default: enabled)
TLSv1.2 checkbox (default: enabled)
TLSv1.1 checkbox (default: disabled)
TLSv1checkbox (default: disabled)
On Cipher Suite Level menu, select one:
High radio button
Medium radio button (default)
Low radio button
Custom radio button (expands dialog). Enter Custom Cipher Suite.
Click Save. ZPE Cloud ensures all deployment activity is done at the device location.

Was this article helpful?