The Nodegrid Net Services Router supports a variety of different modules. All modules are not hot-swappable and need to be installed before the unit is powered up. The modules should be installed in an ESD protected environment to avoid damage. To install a card, follow the steps below:
- Ensure that the Nodegrid Net Services Router is powered off.
- Turn off the power supplies on the Nodegrid Net Services Router.
- Unscrew the blanking panel which covers the slot in which the module should be installed.
- Unbox the card and insert it into the appropriate slot.
- Fix the card with the provided screws.
- The Nodegrid Net Services Router can now be turned on.
NOTE
The blanking panel should be kept for later use. For thermal efficiency and safety, each unused slot needs to be covered with a blanking panel.
Module Compatibility Layout
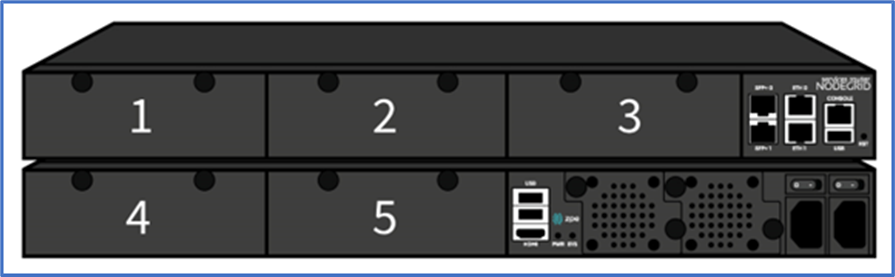
Nodegrid Net Services Router Expansion Module Compatibility Chart
Expansion card | Slot 1 | Slot 2 | Slot 3 | Slot 4 | Slot 5 |
16-Port GbE Ethernet | ✓ | ✓ | ✓ | Secure Isolated Mode ** | Secure Isolated Mode ** |
16-Port SFP | ✓ | ✓ | ✓ | Secure Isolated Mode ** | Secure Isolated Mode ** |
16-Port Serial | ✓ | ✓ | ✓ | ✓ | ✓ |
16-Port USB | ✓ | ✓ | ✓ | ✓ | ✓ |
M.2 Cellular / WiFi | ✓ | ✓ | ✓ | ✓ | ✓ |
8-Port SFP+ | ✓ | ✓ | ✓ | Secure Isolated Mode ** | Secure Isolated Mode ** |
8-Port POE+ | ✓ | ✓ | ✓ | – | – |
Compute | ✓ | ✓ | ✓ | Secure Isolated Mode ** | Secure Isolated Mode ** |
Storage * | – | – | – | ✓ | ✓ |
M.2 SATA * | – | – | – | ✓ | ✓ |
NOTES
(*) The Nodegrid Net Services Router supports a maximum of 2 SATA drives, which can be divided into 2 Storage cards or in one M.2 SATA card.
(**) The Secure Isolated Mode allows for the management of the cards as if they would be located in a normal Slot, but the network traffic is isolated from any other slot.
(**) The Secure Isolated Mode allows for the management of the cards as if they would be located in a normal Slot, but the network traffic is isolated from any other slot.