Manage Devices
- 04 Dec 2023
- 7 Minutes to read
- Print
- DarkLight
- PDF
Manage Devices
- Updated on 04 Dec 2023
- 7 Minutes to read
- Print
- DarkLight
- PDF
Article summary
Did you find this summary helpful?
Thank you for your feedback
Add Device
- Go to Managed Devices :: Devices.
- Click Add (displays dialog).
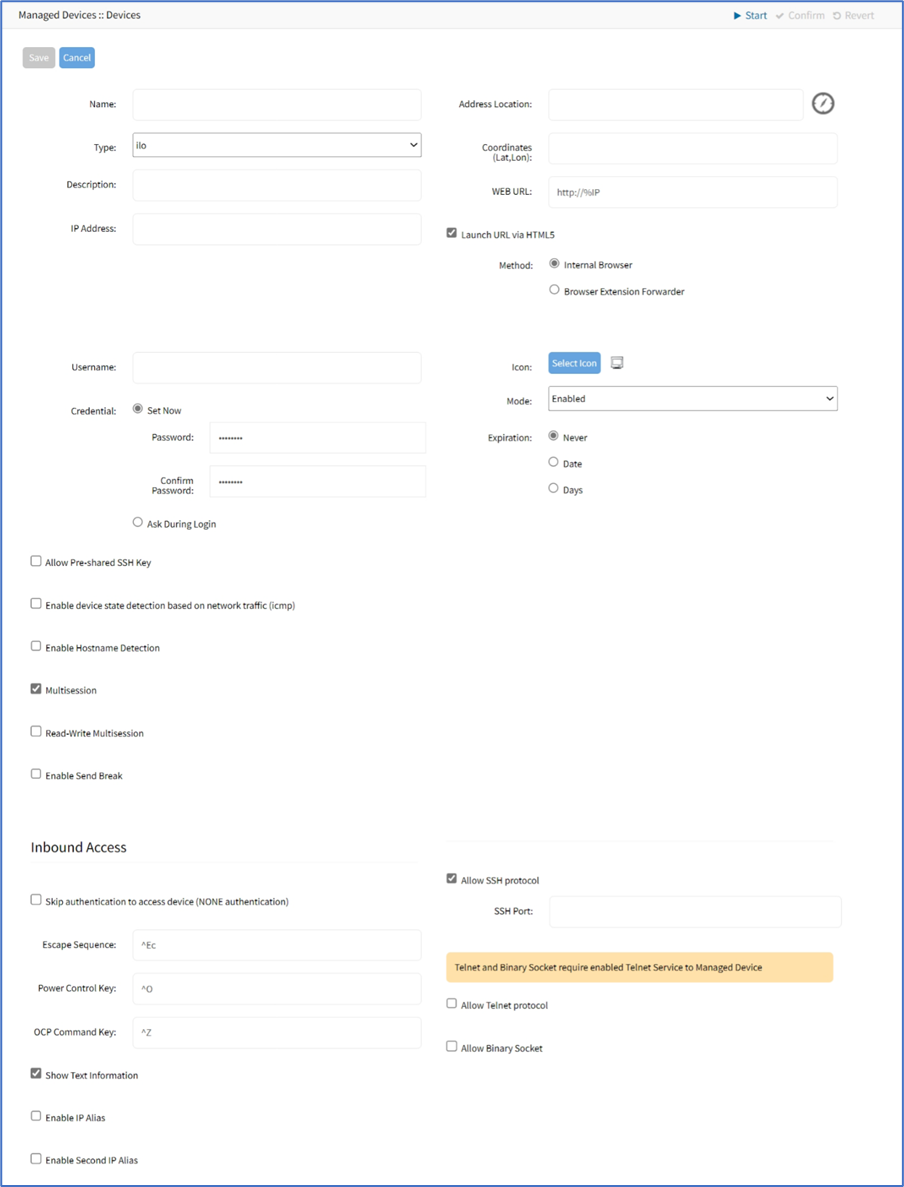
- Enter Name.
- In the Type drop-down, select one.
- Service Processor devices (ilo, imm, drac, drac6, idrac7, ilom, ipmi_1.5, ipmi_2.0, intel_bmc, openbmc)
IP Address (reachable by the Nodegrid Platform) - Switch devices (switch_edgecore)
IP Address (reachable by the Nodegrid Platform) - Infrabox devices (infrabox)
IP Address (reachable by the Nodegrid Platform) - Netapp devices (netapp)
IP Address (reachable by the Nodegrid Platform) - Cisco UCS Blade devices (cimc_ucs)
IP Address (reachable by the Nodegrid Platform)
ChassisID
Blade ID - Virtual Console KVM devices (virtual_console_kvm)
IP Address (reachable by the Nodegrid Platform)
Port - Console Server devices (console_server_nodegrid, console_server_acs, console_server_acs6000, console_server_lantronix, console_server_opengear, console_server_digicp, console_server_raritan, console_server_perle)
IP Address (reachable by the Nodegrid Platform)
Port - PDU devices (pdu_apc, pdu_baytech, pdu_digital_logger, pdu_eaton, pdu_mph2, pdu_pm3000, pdu_cpi, pdu_raritan, pdu_geist, pdu_servertech, pdu_enconnex, pdu_cyberpower, pdu_rittal)
IP Address (reachable by the Nodegrid Platform) - KVM Virtual Machine devices (virtual_console_kvm)
Name (must match the hypervisor name)
IP Address (reachable by the Nodegrid Platform) - KVM devices (kvm_dsr, kvm_mpu, kvm_aten, kvm_raritan)
IP Address (reachable by the Nodegrid Platform)
- Service Processor devices (ilo, imm, drac, drac6, idrac7, ilom, ipmi_1.5, ipmi_2.0, intel_bmc, openbmc)
- Address Location (a valid address for the device location).
Coordinates (Lat, Lon) (if GPS is available, click Compass icon) or manually enter GPS coordinates. - Web URL
Launch URL via HTML5 checkbox (expands options). In Method menu, select one: Internet Browser radio button
Browser Extension Forwarder radio button (read note)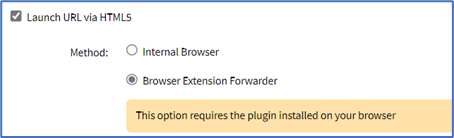
- Username
In the Credential menu, select one:
Set Now radio button. Enter the Password and Confirm the Password.
Ask During Login radio button (user credentials are entered during login). - Select checkboxes, as needed:
- Allow Pre-shared SSH Key checkbox.
- Enable device state detection based on network traffic (icmp) checkbox
- Enable Hostname Detection checkbox
- Multisession checkbox
- Read-Write Multisession checkbox
- Enable Send Break checkbox
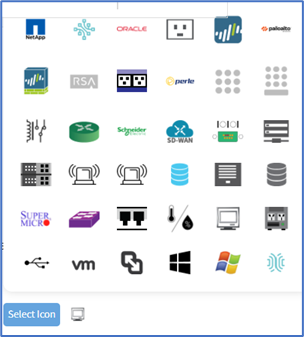
- Select Icon. On the pop-up dialog, select an icon.
- Mode drop-down, select one (Enabled, On-demand, Disabled).
- On the Expiration menu, select one:
- Mode drop-down, select one (Enabled, On-demand, Disabled).
- Expirationmenu, select one:
- Never radio button
- Date radio button. Enter Date (YYYY-MM-DD)
- Days radio button. Enter Duration.
- On Type drop-down:
- If openbmc is selected, the FRU menu displays (below the Expiration menu).
 NOTEThe OpenBMC platform contains various Field Replaceable Units (FRUs) like Side Plane Board (spb), OCP Mezzanine Card, and four 1S server boards.
 - In the FRU menu, select one:
Side Plane Board radio button
Server Board radio button (expands dialog). For Slot Number, specify which 1 of 4 1S server boards to control. - If console_server_xxx is selected, the Endpoint menu displays (below the Expiration menu).
Appliance radio button, enter Port Number
Serial Port radio button, enter Port Number
USB Port radio button (if available), enter Port Number
KVM Port radio button, enter Port Number
- If openbmc is selected, the FRU menu displays (below the Expiration menu).
- In the End Point menu, select one (not available for service processors, virtual consoles);
- Appliance radio button, enter Port Number
- Serial Port radio button, enter Port Number
- USB Port radio button (if available), enter Port Number
- KVM Port radio button, enter Port Number
- Appliance radio button, enter Port Number
- In the Inbound Access menu:
- Skip Authentication to access device (NONE authentication) checkbox (if unselected, enter the following details).
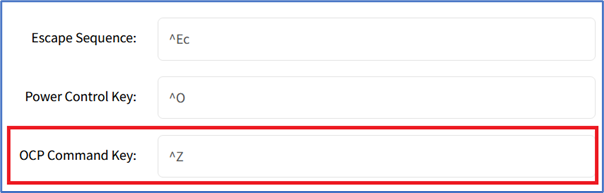
Escape Sequence (prefix for Console commands – i.e., “^Ec.” to close Console)
Power Control Key (Power Control menu for the device displays) - Show Text Information checkbox
- Enable IP Alias checkbox (expands dialog)
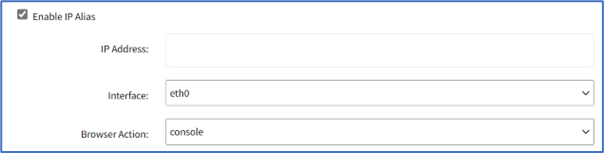 IP Address
Interface drop-down, select one (eth0, eth1, loopback, loopback1)
Browser Action drop-down, select one (console, web) - Allow Telnet Protocol checkbox, enter TCP Socket Port
- Allow Binary Socket checkbox, enter TCP Socket Port
- (optional) Enable Second IP Alias checkbox
IP Address
Interface drop-down, select one (eth0, eth1, loopback, loopback1)
Browser Action drop-down, select one (console, web) - Allow Telnet Protocol checkbox, enter, enter TCP Socket Port
- Allow Binary Socket checkbox, enter TCP Socket Port
- Allow SSH protocol checkbox, enter SSH Port
- At this location:
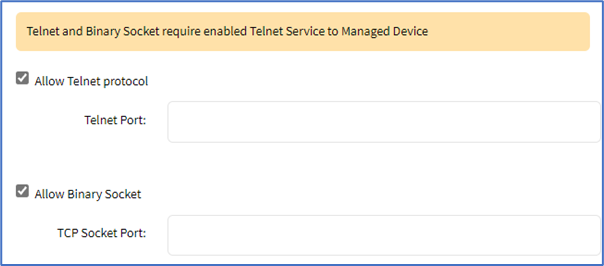 Allow Telnet Protocol. checkbox, enter TCP Socket Port
Allow Binary Socket checkbox, enter TCP Socket Port
- Skip Authentication to access device (NONE authentication) checkbox (if unselected, enter the following details).
- Click Save.

 Internet Browser radio button


 Allow Telnet Protocol. checkbox, enter TCP Socket Port
CLI Procedure
- Go to /settings/devices.
- Use the add command to create a new device.
- Use the set command to define the following settings, and save the changes with commit.
[admin@nodegrid /]# cd /settings/devices
[admin@nodegrid devices]# add
[admin@nodegrid {devices}]# set name=IPMI
[admin@nodegrid {devices}]# set type=ipmi_2.0
[admin@nodegrid {devices}]# set ip_address=192.168.10.11
[admin@nodegrid {devices}]# set credential=ask_during_login

or

[admin@nodegrid {devices}]# set credential=set_now
[admin@nodegrid {devices}]# set username=admin password=admin

[admin@nodegrid {devices}]# commit
Configure Rack PDU
This process requires two steps:
- Add the PDU device. See Add Device.
- Configure the PDU with the procedure below.
- Go to Managed Devices :: Devices.
- Locate and click the Name of the newly added Rack PDU.
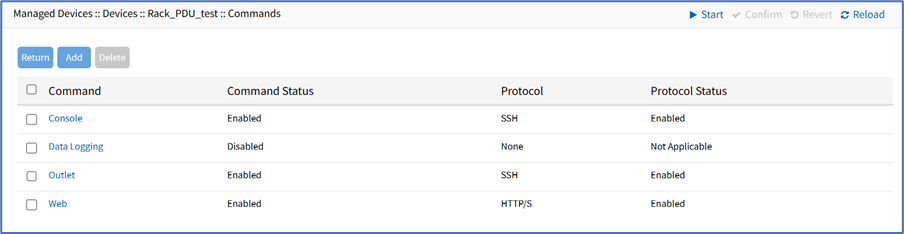
- On the Commands tab, Command column, click Outlets.
- On the Outlet dialog, Protocol drop-down, select SNMP.
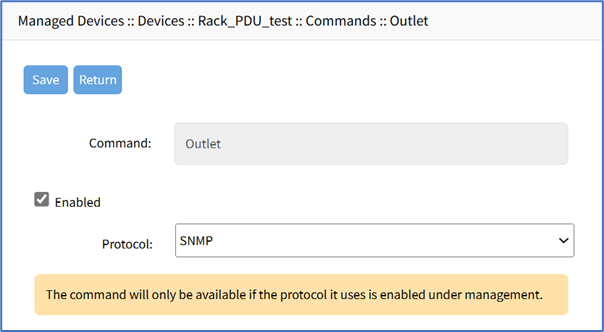
- Click Save.
- On the Management tab, in the SNMP menu, update values to match the Rack PDU settings (see manufacturer’s manual).
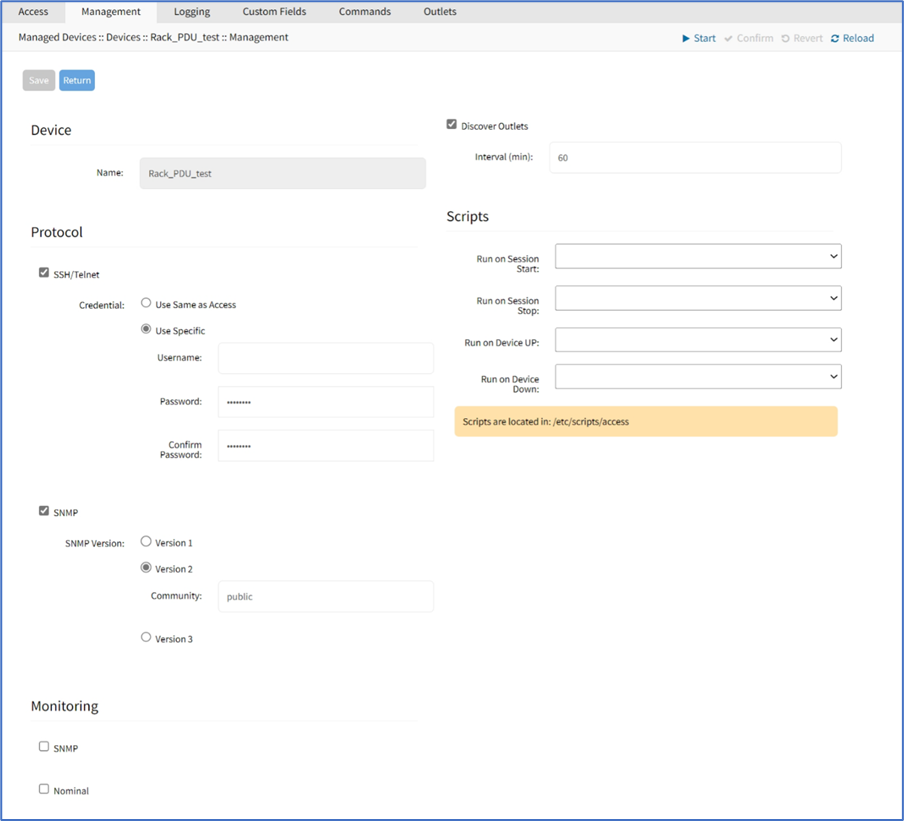
- Click Save.NOTEUse SNMP settings to provide read and write access. Read-Only credentials can not control power outlets.


The Rack PDU Outlets are automatically discovered (may need a few minutes, depending on the Rack PDU).
CLI Procedure
- Go to /settings/devices/<device name>/commands/outlet.
- Change the protocol to SNMP.
- Go to /settings/devices/<device name>/management.
- Enable SNMP and select the desired SNMP version and details.
- Save the changes with commit.NOTEUse SNMP settings to provide read and write access. Read-Only credentials can not control power outlets.
The Rack PDU Outlets are automatically discovered (may need a few minutes, depending on the Rack PDU).
[admin@nodegrid /]# cd /settings/devices
[admin@nodegrid devices]# add
[admin@nodegrid {devices}]# set name=Rack_PDU
[admin@nodegrid {devices}]# set type=pdu_servertech
[admin@nodegrid {devices}]# set ip_address=192.168.2.39
[admin@nodegrid {devices}]# set credential=ask_during_login

or

[admin@nodegrid {devices}]# set credential=set_now
[admin@nodegrid {devices}]# set username=admin password=admin

[admin@nodegrid {devices}]# commit
[admin@nodegrid /]# cd /settings/devices/Rack_PDU/commands/outlet
[admin@nodegrid outlet]# set protocol=snmp
[admin@nodegrid outlet]# cd /settings/devices/Rack_PDU/management/
[admin@nodegrid management]# set snmp=yes
[+admin@nodegrid management]# snmp_version = v2
[+admin@nodegrid management]# snmp_commmunity = private
[+admin@nodegrid management]# commit
Edit Device
- Go to Managed Devices :: Devices.
- In the Name column, locate device and select checkbox.
- Click Edit (displays dialog).NOTEIf the device type is USB OCP, this additional field displays. Modify OCP Command Key as needed. (available in v5.8+)
- Make changes, as needed.
- Click Save.

Delete Device
- Go to Managed Devices :: Devices.
- In the Name column, locate the device and select the checkbox.
- Click Delete.
- On the Confirmation dialog, click OK.
Managing devices individually
- Go to Managed Devices :: Devices. All the devices are listed on this page.
- Click the link to any device.
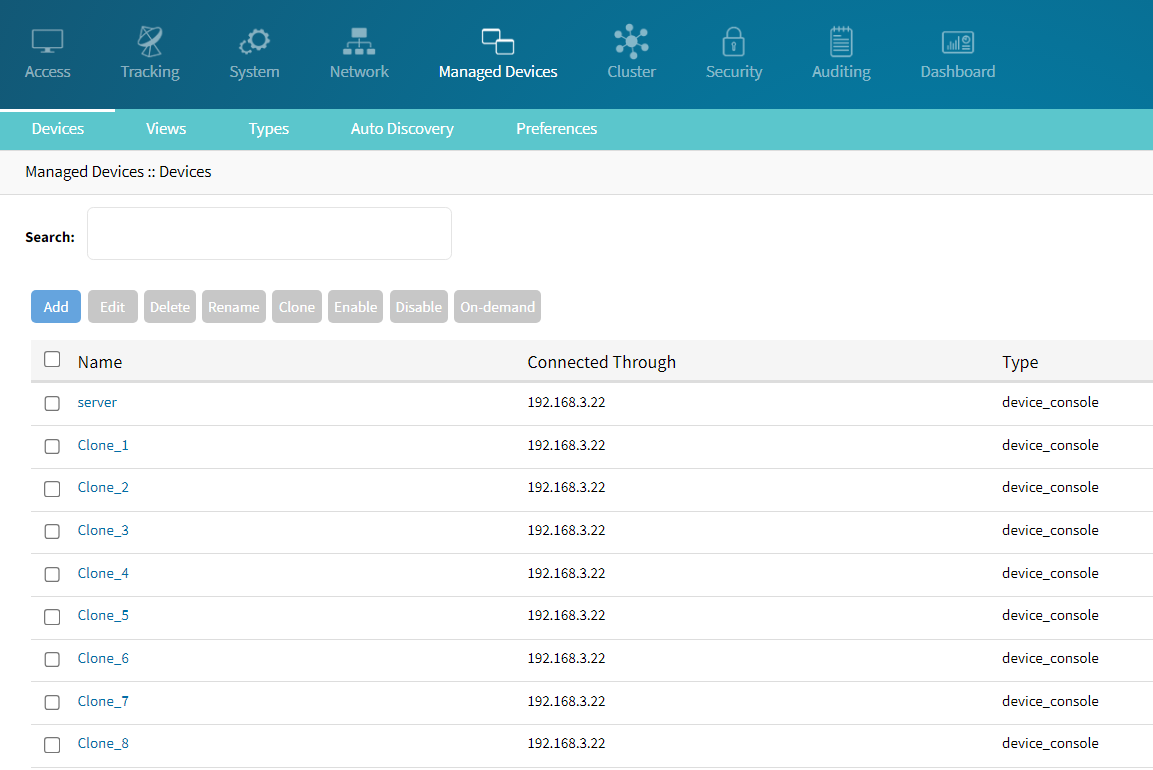
- You can update any device configuration. For example, rename a device by overwriting a new name in the Name field.
- Once you make changes the Save button becomes active. Click Save to save the changes.
- The Return button takes you back to the Devices tab page where all the devices are listed.
- Click Info, and the user is directed to Access :: Table to view the device description and additionally perform the actions as described in the TableTab section.


Launching the Local Application field
The Console drop-down list is visible only when you enable the Launch Local Application for the selected device. You can select the Launch Local Application option when you want to launch the local ssh or telnet instead of opening a new browser tab to handle the connection. To enable the Console option and Launch Local Application, perform the following actions :
- Go to Managed Devices> Devices, and select the required device from the list.
- Go to the Commands tab.
- Select the Launch Local Application field.
- Click Save.

Rename Device
- Go to Managed Devices :: Devices.
- In the Name column, locate the device and select the checkbox.
- Click Rename (displays dialog). Enter New Name.
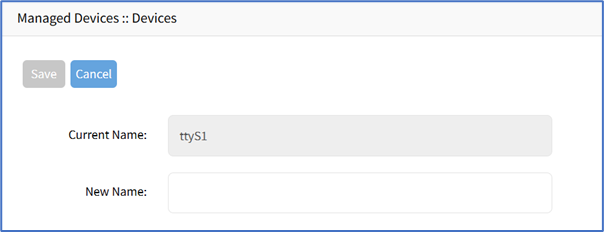
- Click Save.

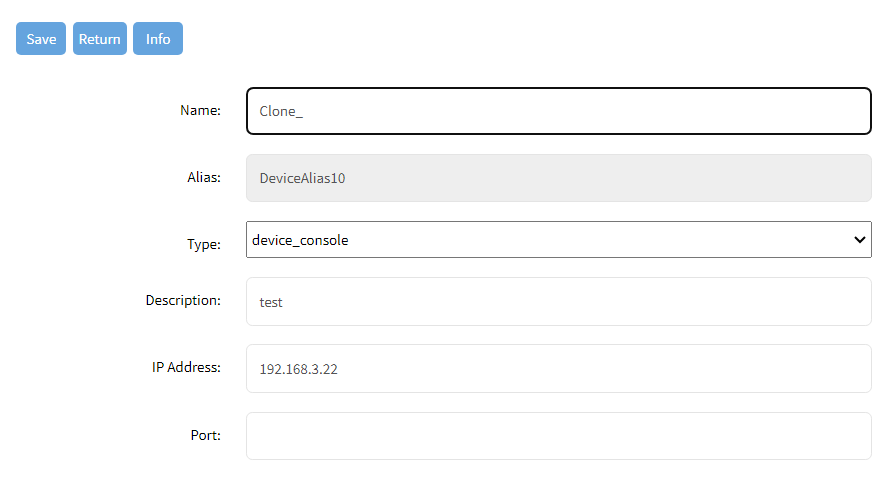
Clone Device
- Go to Managed Devices :: Devices.
- In the Name column, locate the device and select the checkbox.
- Click Clone (displays dialog).
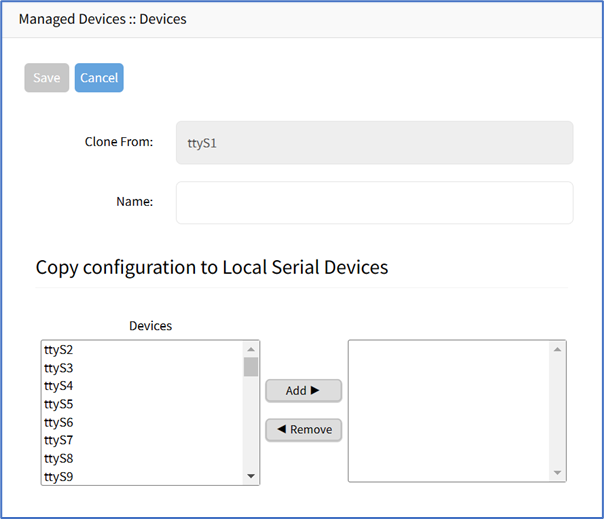
- Enter Name.
- In Copy configuration to Local Serial Devices section:
Select from the left-side panel, click Add► to move to the right-side panel.
To remove from the right-side panel, select, and click ◄Remove. - Click Save.

Enable Device
- Go to Managed Devices :: Devices.
- In the Name column, locate the device and select the checkbox.
- Click Enable.
Disable Device
- Go to Managed Devices :: Devices.
- In the Name column, locate device and select checkbox.
- Click Disable.
Set Device to On-Demand
- Go to Managed Devices :: Devices.
- In the Name column, locate device and select checkbox.
- Click On-Demand.
Set Device as Default
WARNING
This restores the selected device back to the original factory settings.
- Go to Managed Devices :: Devices.
- In the Name column, locate device and select checkbox.
- Click Default.
Run Bounce DTR
This puts the DTR and RTS pins DOWN – waits 500ms, then put those pins UP.
- Go to Managed Devices :: Devices.
- In the Name column, locate device and select checkbox.
- Click Bounce DTR.
Configure Chatsworth (CPI) eConnect PDU
(available in v5.6+)
This unit must be physically connected to a serial port or USB port of a Nodegrid device. This PDU can merge IT devices to PDU outlets for more intuitive power control. Console access is included. Activities are recorded on the serial data log. Features include Outlet Auto Discovery and Outlet Control (Power On, Off, Cycle, Status).
NOTE
Console + CLI should be available on the PDU device - find your model in the CPI Quick Reference.
- Go to Managed Devices :: Devices.
- Click on the serial device the PDU is connected.
- On Type drop-down, select pdu_cpi_serial
- Enter Username.
- Enter Password and Confirm Password
- (as needed) Review and adjust serial configuration details (Baud Rate, Parity, etc.)
- Click Save.
Auto Discovery
Auto-Discovery automatically detects the CPI PDU. The CPI PDU details are available in device's Outlets sub-tab.
If not automatically discovered, check here.
- Go to Auto-Discovery :: Discover Now.
- Select PDU serial device name checkbox.
- Click Discover Now.
- To confirm, go to Access :: Table.
- Click on the PDU serial device name and check the Discovered Outlets in the table.
Merged Outlets
To see merged outlets.
- Go to Managed Devices :: Devices :: <device name> :: Commands.
- Review Merged panel details (this example shows eConnect PDU attached with two devices).
 Image Caption
Was this article helpful?