To manage chain functions/settings, click on the name in the Chain column (displays dialog).

Note: If you import a configuration for a chain through CLI, the rules defined for the specified chain(s) will be overridden by the imported configuration. For example, if you are importing configuration For the INPUT and OUTPUT chains, the FORWARD chain will not be changed, only the INPUT and OUTPUT chains are updated.
Add Chain Setting (all Type selections)
- Go to Security :: NAT.
- In the Chain column, locate and click on the name (displays dialog).
- Click Add (displays dialog).

- On Target menu:
- On Target drop-down, select one (ACCEPT, DNAT, REDIRECT, LOG, RETURN).
- Enter Rule Number.
- Enter Description.
- On the Match Options menu:
- Enter Source IP/Mask.
- Select Reverse match for source IP/mask checkbox.
- Enter Destination IP/Mask.
- Enter Source MAC Address.
- Select Reverse match for source MAC address checkbox.Note: The Source MAC Address and Reverse Match for the source MAC Address fields are applicable only for Input, PREROUTING, and FORWARD chains.
- Select Reverse match for destination IP/mask checkbox.
- Select the required Input Interface from the drop-down list. (Any, lo, eth0, eth1).Note: The Source MAC Address and Reverse Match for the source MAC Address fields are applicable only for Input, PREROUTING, and FORWARD chainsSelect Reverse match for the input interface checkbox.
- Select Enable State Matchcheckbox (displays options – one or more can be selected):
- NEW checkbox
- ESTABLISHED checkbox
- RELATED checkbox
- INVALID checkbox
- SNAT checkbox
- DNAT checkbox
- Reverse state match checkbox
- On the Fragments drop-down, select one (All packets and fragments, Unfragmented packets and 1st packets, 2nd and further packets).
(if Type selection: DNAT) Enter To Destination.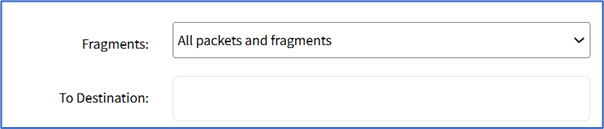
- On the Protocol menu, select one:
- Numeric radio button (expands dialog). Enter the Protocol Number.

- TCP radio button (expands dialog).
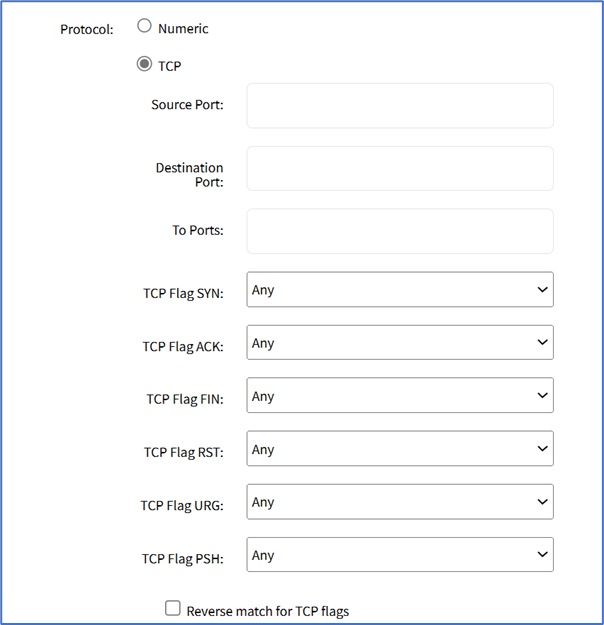
- Enter Source Port.
- Enter Destination Port.
- Enter To Ports.
- TCP Flag SYN drop-down, select one (Any, Set, Unset).
- TCP Flag ACK drop-down, select one (Any, Set, Unset).
- TCP Flag FIN drop-down, select one (Any, Set, Unset).
- TCP Flag RST drop-down, select one (Any, Set, Unset).
- TCP Flag URG drop-down, select one (Any, Set, Unset).
- TCP Flag PSH drop-down, select one (Any, Set, Unset).
- Select Reverse Match for the TCP Flags checkbox.
- UDP radio button (expands dialog):
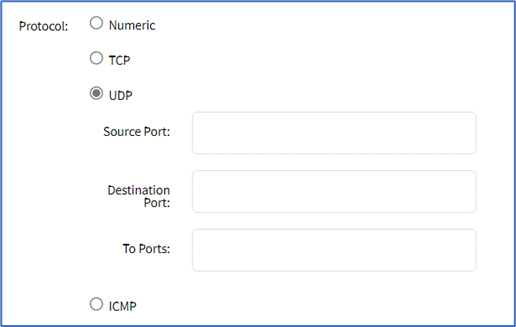
- Enter Source Port.
- Enter Destination Port.
- Enter To Ports.
- ICMP radio button (expands dialog):
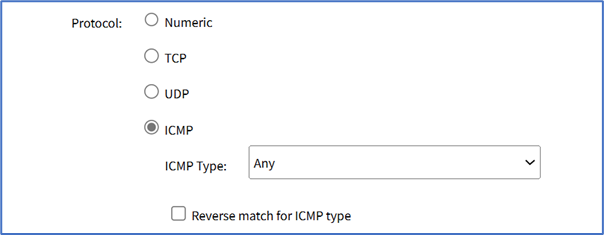
- On ICMP Type drop-down, select one.
- Select Reverse match for ICMP type checkbox.
- Numeric radio button (expands dialog). Enter the Protocol Number.
- Select Reverse match for the protocol checkbox.
- Select Reverse match for the source port checkbox.
- Select Reverse match for the destination port checkbox.
- On the Log Options menu (shows when Type selection: LOG).

- On the Log Level drop-down, select one (Debug, Info, Notice, Warning, Error, Critical, Alert, Emergency).
- Enter Log Profile (name of this profile).
- Select Log TCP Sequence Numbers checkbox.
- Select Log Options From The TCP Packet Header checkbox.
- Select Log Options From The IP Packet Header checkbox.
- Click Save.
Edit Chain Setting
- Go to Security :: NAT.
- In the Chain column, locate and click on the checkbox.
- Click Edit (displays dialog).
- Make changes, as needed.
- Click Save.
Delete Chain Setting
- Go to Security :: NAT.
- In the Chain column, locate and select the checkbox next to the name.
- Click Delete.
- On the confirmation dialog, click OK.
Move Chain Up
- Go to Security :: NAT.
- In the Chain column, locate and select the checkbox on the name.
- Click Up to move up.
Move Chain Down
- Go to Security :: NAT.
- In the Chain column, locate and select the checkbox on the name.
- Click Down to move down.