ZPE Systems as a platform enables deployment of third-party services/applications such Thousand Eyes Digital Experience Monitoring. This guide describes the main steps to deploy ThousandEyes Full Suite of Performance Monitoring in a Noderid Net SR (as depicted in the following diagram).
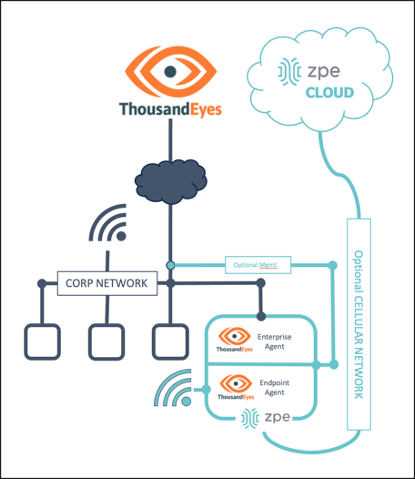
The objective of this use case is to enable both the ThousandEyes Entperprise Agent and the Endpoint Agent to be deployed in a Nodegrid Net SR to monitor both the Internet path performance monitoring as well as the UX or User Experience monitoring to get both the infrastructure and end-user performance data to ensure.
This guide sets up:
- ThousandEye environment configuration and testing setup
- ZPE System as a platform: Deploying a third-party application/service
- Validation of the scenario
Requirements
Nodegrid Appliance
- Nodegrid SR appalince with
- CPU Cores: 8
- RAM: 32GB
- HDD: 2nd disk min 128GB
- Nodegrid NetSR
- Nodegrid GateSR
- Nodegrid Hive SR
Software
- Nodegrid OS 5.6.8 or newer
- Windows 10 or newer (Endpoint Agent)
License
- Virtual Machine License
- Windows license (Endpoint Agent)
Requirements for the Endpoint VM are:
- 4 GB RAM
- 2 vCPU
- 80 GB disk
- 2 virtual network interfaces
- LAN access (virt0 -> eth0)
- WiFi access (usb-01 -> Wireless)
Version v5.6.8
CPU Intel(R) Atom(TM) CPU C3558 @ 2.20GHz
CPU Cores 8
RAM 32GB
Disk 256GB
ThousandEyes Agent
The following guidelines are based on
Prerequisites
• ThousandEyes account (trial account optional)
• Multifactor App or Token (optional)
Setting up Enterprise Agent Tests
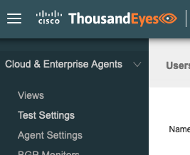
- On the ThousandEyes Dashboard, click the ***STACK ***icon .
- On the dropdown menu please choose Cloud & Enterprise Agents. That will expand the menu, please click Test Settings
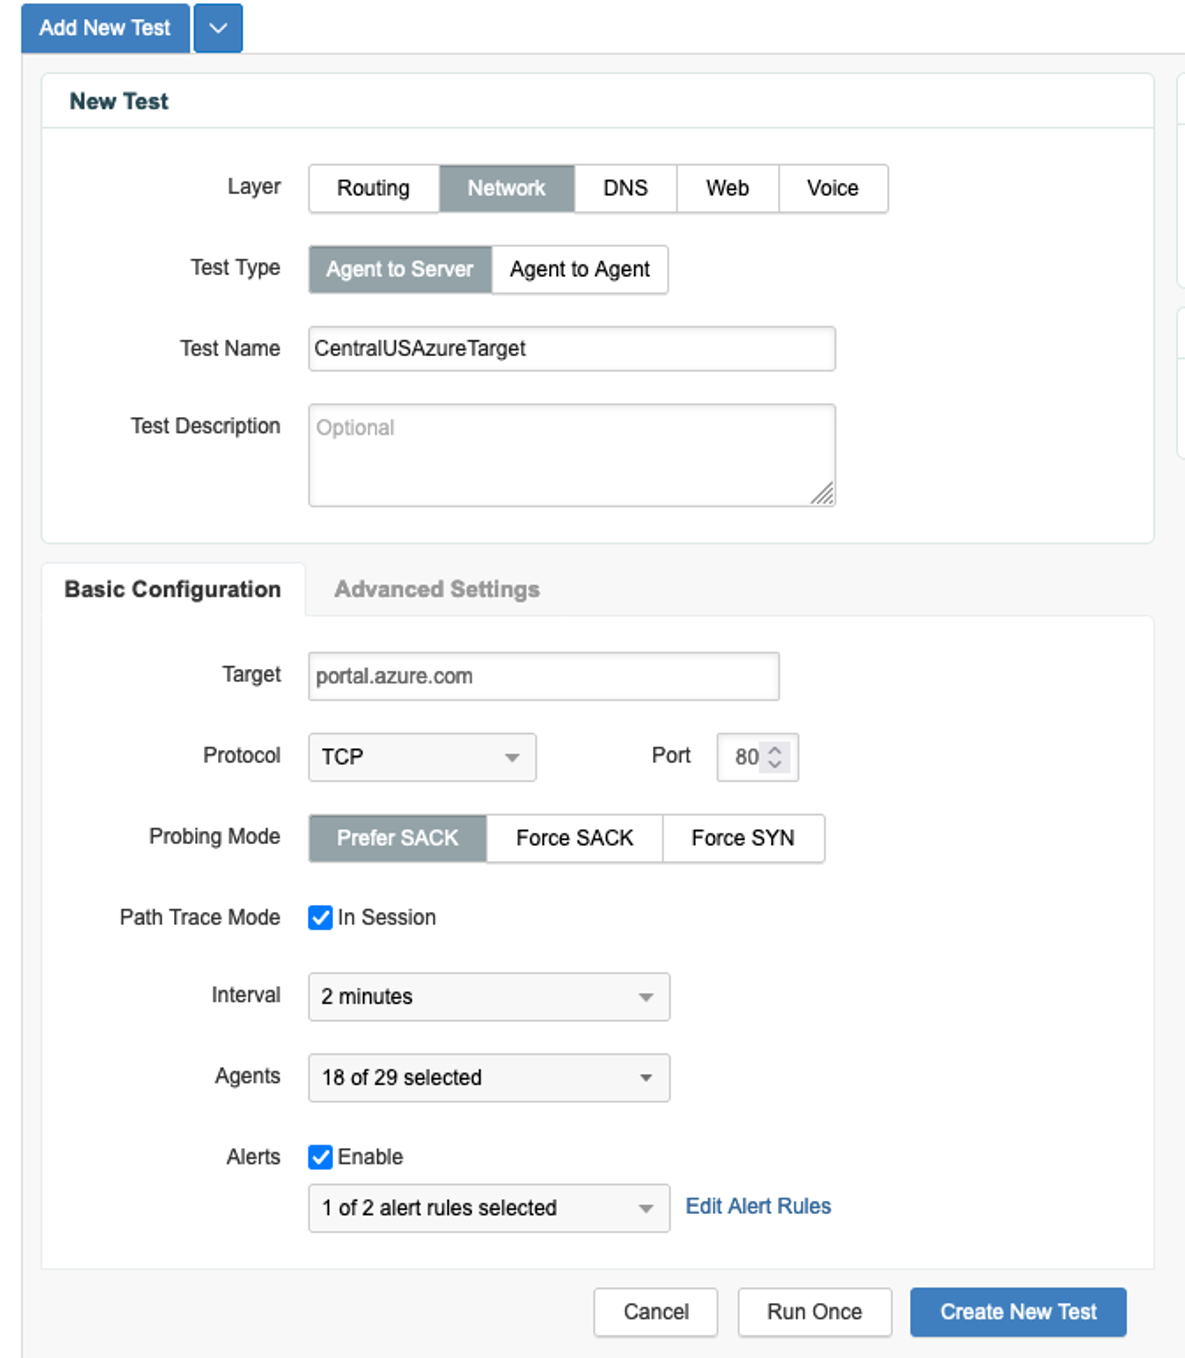
- At the top of the menu screen, select Add New Test button.
- In the new dialog window create a new test with the following values.
| Setting | Value | Comment |
|---|---|---|
| Layer | Network | |
| Test Type | Agent to Server | |
| Test Name | <Test Name> | |
| Target | <Target Name> | Provide a valid monitoring target |
| Agents | Agent Selection |
Installing the Enterprise Agent - Docker
- On the ThousandEyes Dashboard, click the STACK icon .
- On the dropdown menu please choose Cloud & Enterprise Agents. That will expand the menu, please click Agent Settings
- Please click the Add New Enterprise Agent button.
- The dialog will appear for choosing the type of installation for the device.
- For this integration we will use the Docker capabilities on the Nodegrid unit.
- Filling in the Name on the form and the Host Vol Agent Directory will fill in the code to both install and run the Docker container commands.
- Log in to the Nodegrid WebUI as an admin, go to Access :: Table and click Console:
- Switch to the root shell using the following command:
shell sudo su -
- Copy and run the following commands to configure seccomp and apparmor profiles for docker:
curl -Os https://downloads.thousandeyes.com/bbot/configure_docker.sh
chmod +x configure_docker.sh
sudo ./configure_docker.sh
- Install ThousendEyes Agent by copying the provided docker commands.
a. Add the following line to the docker run command:
-v /sys/fs/cgroup:/sys/fs/cgroup \
b. Run the following commands:
docker pull thousandeyes/enterprise-agent > /dev/null 2>&1
docker stop '<AGENT NAME>' > /dev/null 2>&1
docker rm '<AGENT NAME>' > /dev/null 2>&1
docker run \
  --hostname='<AGENT NAME>' \
  --memory=2g \
  --memory-swap=2g \
  --detach=true \
  --tty=true \
  --shm-size=512M \
  -e TEAGENT_ACCOUNT_TOKEN=<AGENT KEY> \
  -e TEAGENT_INET=4 \
  -v '/<AGENT DIR>/thousandeyes/<AGENT NAME>/te-agent':/var/lib/te-agent \
  -v '/<AGENT DIR>/thousandeyes/<AGENT NAME>/te-browserbot':/var/lib/te-browserbot \
  -v '/<AGENT DIR>/thousandeyes/<AGENT NAME>/log/':/var/log/agent \
  -v /sys/fs/cgroup:/sys/fs/cgroup \
  --cap-add=NET_ADMIN \
  --cap-add=SYS_ADMIN \
  --name '<AGENT NAME>' \
  --restart=unless-stopped \
  --security-opt apparmor=docker_sandbox \
  --security-opt seccomp=/var/docker/configs/te-seccomp.json \
  thousandeyes/enterprise-agent /sbin/my_init
- Vetify that the ThousendEyes agent is running:
- To verify using console: Run the following command from the root shell to list all running Docker containers:
docker ps
This command will display a list of all running containers, including the ThousandEyes container, as shown in your screenshot. You should see an entry similar to this:

b. To verify Using the WebUI: Navigate to the WebUI of your Docker management tool.
1. Go to the Applications section.
2. Check the Containers tab for the ThousandEyes container.
Ensure that its state is running as shown in your screenshot.
In the WebUI screenshot, you can see the tsAgent2 container with the image thousandeyes/enterprise-agent is running with the command /sbin/my_init, utilizing 8% of the CPU and 1.59 GiB of memory out of 2 GiB available.
Using either of these methods will confirm that the ThousandEyes agent is running on your system.
Installing the Endpoint Agent - VM
Installing the Endpoint Agents will require full Virtual Machine capability. This blended capability of Docker containers and full virtual machines allows Nodegrid to fully deploy the capabilities of Thousand Eyes into a single platform that is resilient, secure, and consolidated. This simplifies operations an incredible amount of guest services networks, agentless networks, and many other IoT and OT (industrial) systems that may need monitoring for critical functions. The agent-based approach ensures that these networks remain functional and available from an end-user perspective.
Installation of Windows VM
- To deploy a full Microsoft Windows VM with a dedicated USB WiFi adapter. Begin by plugging these adapters into your Nodegrid SR appliance.
- Login to the Nodegrid WebUI with an admin account
- An ISO image or QCOW (KVM) image of windows can be uploaded using your favorite SCP (Secure Copy) tool onto the Nodegrid or simply use the File Manager in the Nodegrid interface.
Note: This guide assumes that a fresh installation of Windows will be performed
- To create a new Windows installation, navigate to Applications -> Virtual Machines
- To create a new Windows instance lick the Create VM button on the right hand side
- Create a the new VM with the following values
| Setting | Value | Comment |
|---|---|---|
| Name | Name | |
| Installation Type | Local Install Media | Select the uploaded ISO file |
| Operating System | Windows 10 | |
| Volumne | Create a new Volumne | |
| Volumne Size | 80GB | |
| RAM | 4GB | |
| Immidiate Start VM | Enabled |
- Follow the Normal Windows process
- To connect USB WiFi dongles to the VM, navigate to Managed Devices
- Select the USB port to which the dongle is connected and select Edit
- In the settings Enable the option Automatically map connected devices to Virtual Machine
- Provide the VM name in the field Virtual Machine Name. IMPORTENT: the Name is case sensitive and must match the name used for the Virtual Machine
- The Wifi dongles are now presented to the Windows VM and the drivers can be installed
- In Windows connect the WiFi dongles to WiFi networks which should be monitored
- Install a ThousendEyes Endpoint Agent
Create an Enterprise Test
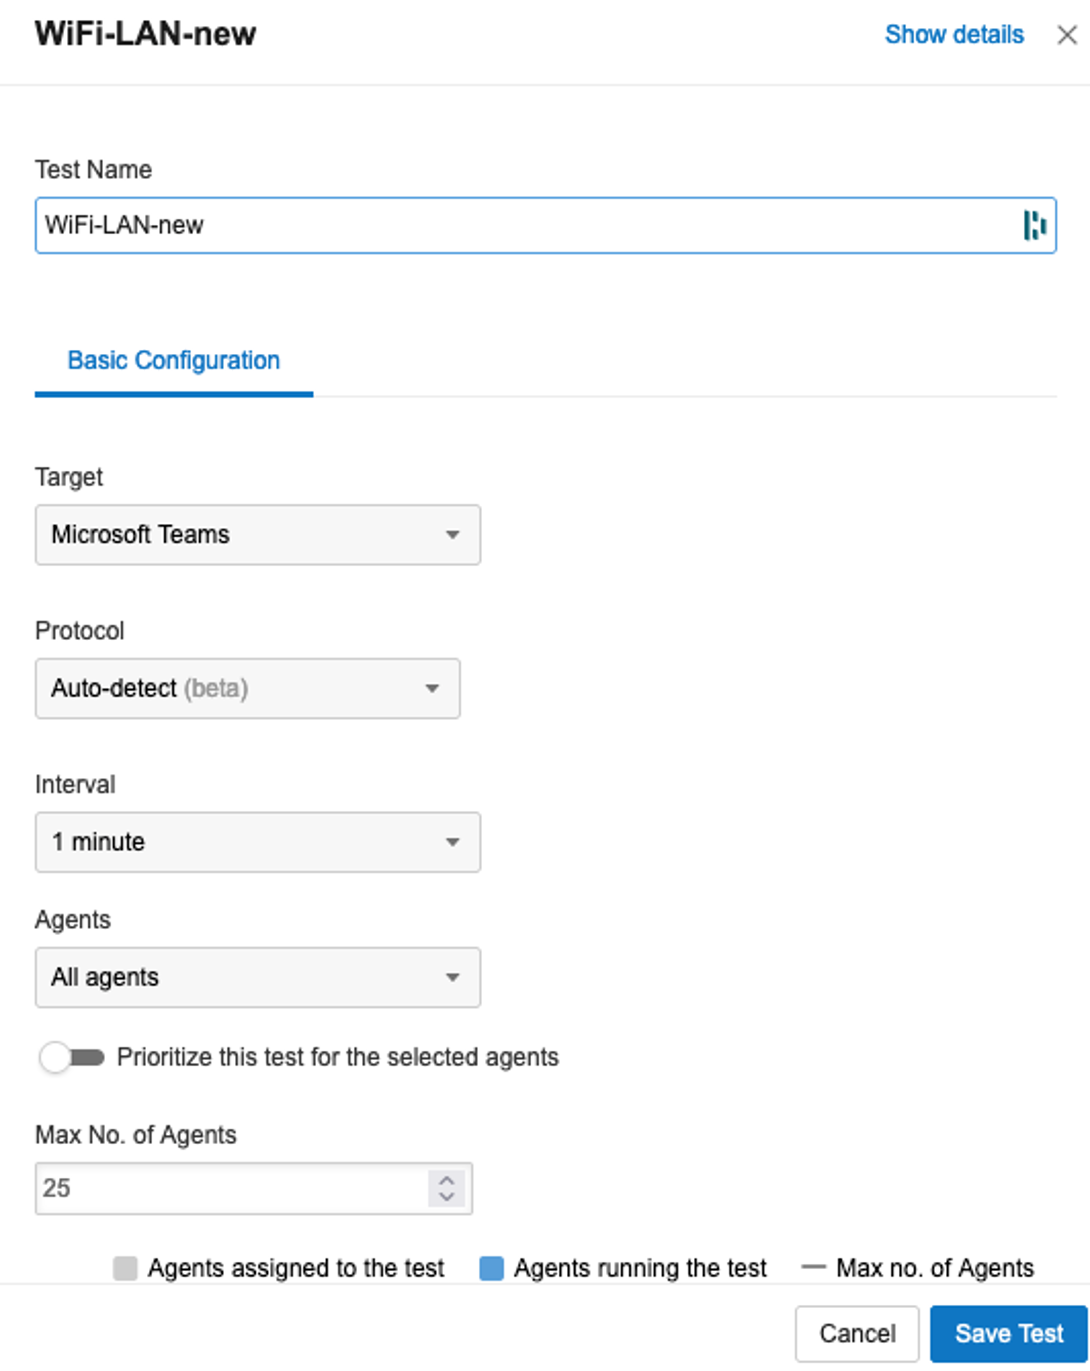
- In the ThousandEyes Dashboard, navigate to Endpoint Agents > Monitoring Settings > Automated Session Tests > Add New Test
- The Automated session should be given an identifiable name that correlates with the test and possible location or region that it will correspond to. There are some particular protocols that are heavily affected by network performance like Microsoft Teams. The most important part is to assign your agents you have already created. There is an easy selection dialog under the Agents drop-down:
Important: It will take some time for the tests to generate meaningful data. Please be patient and allow for 30 minutes to an hour for proper population of data into the ThousandEyes app
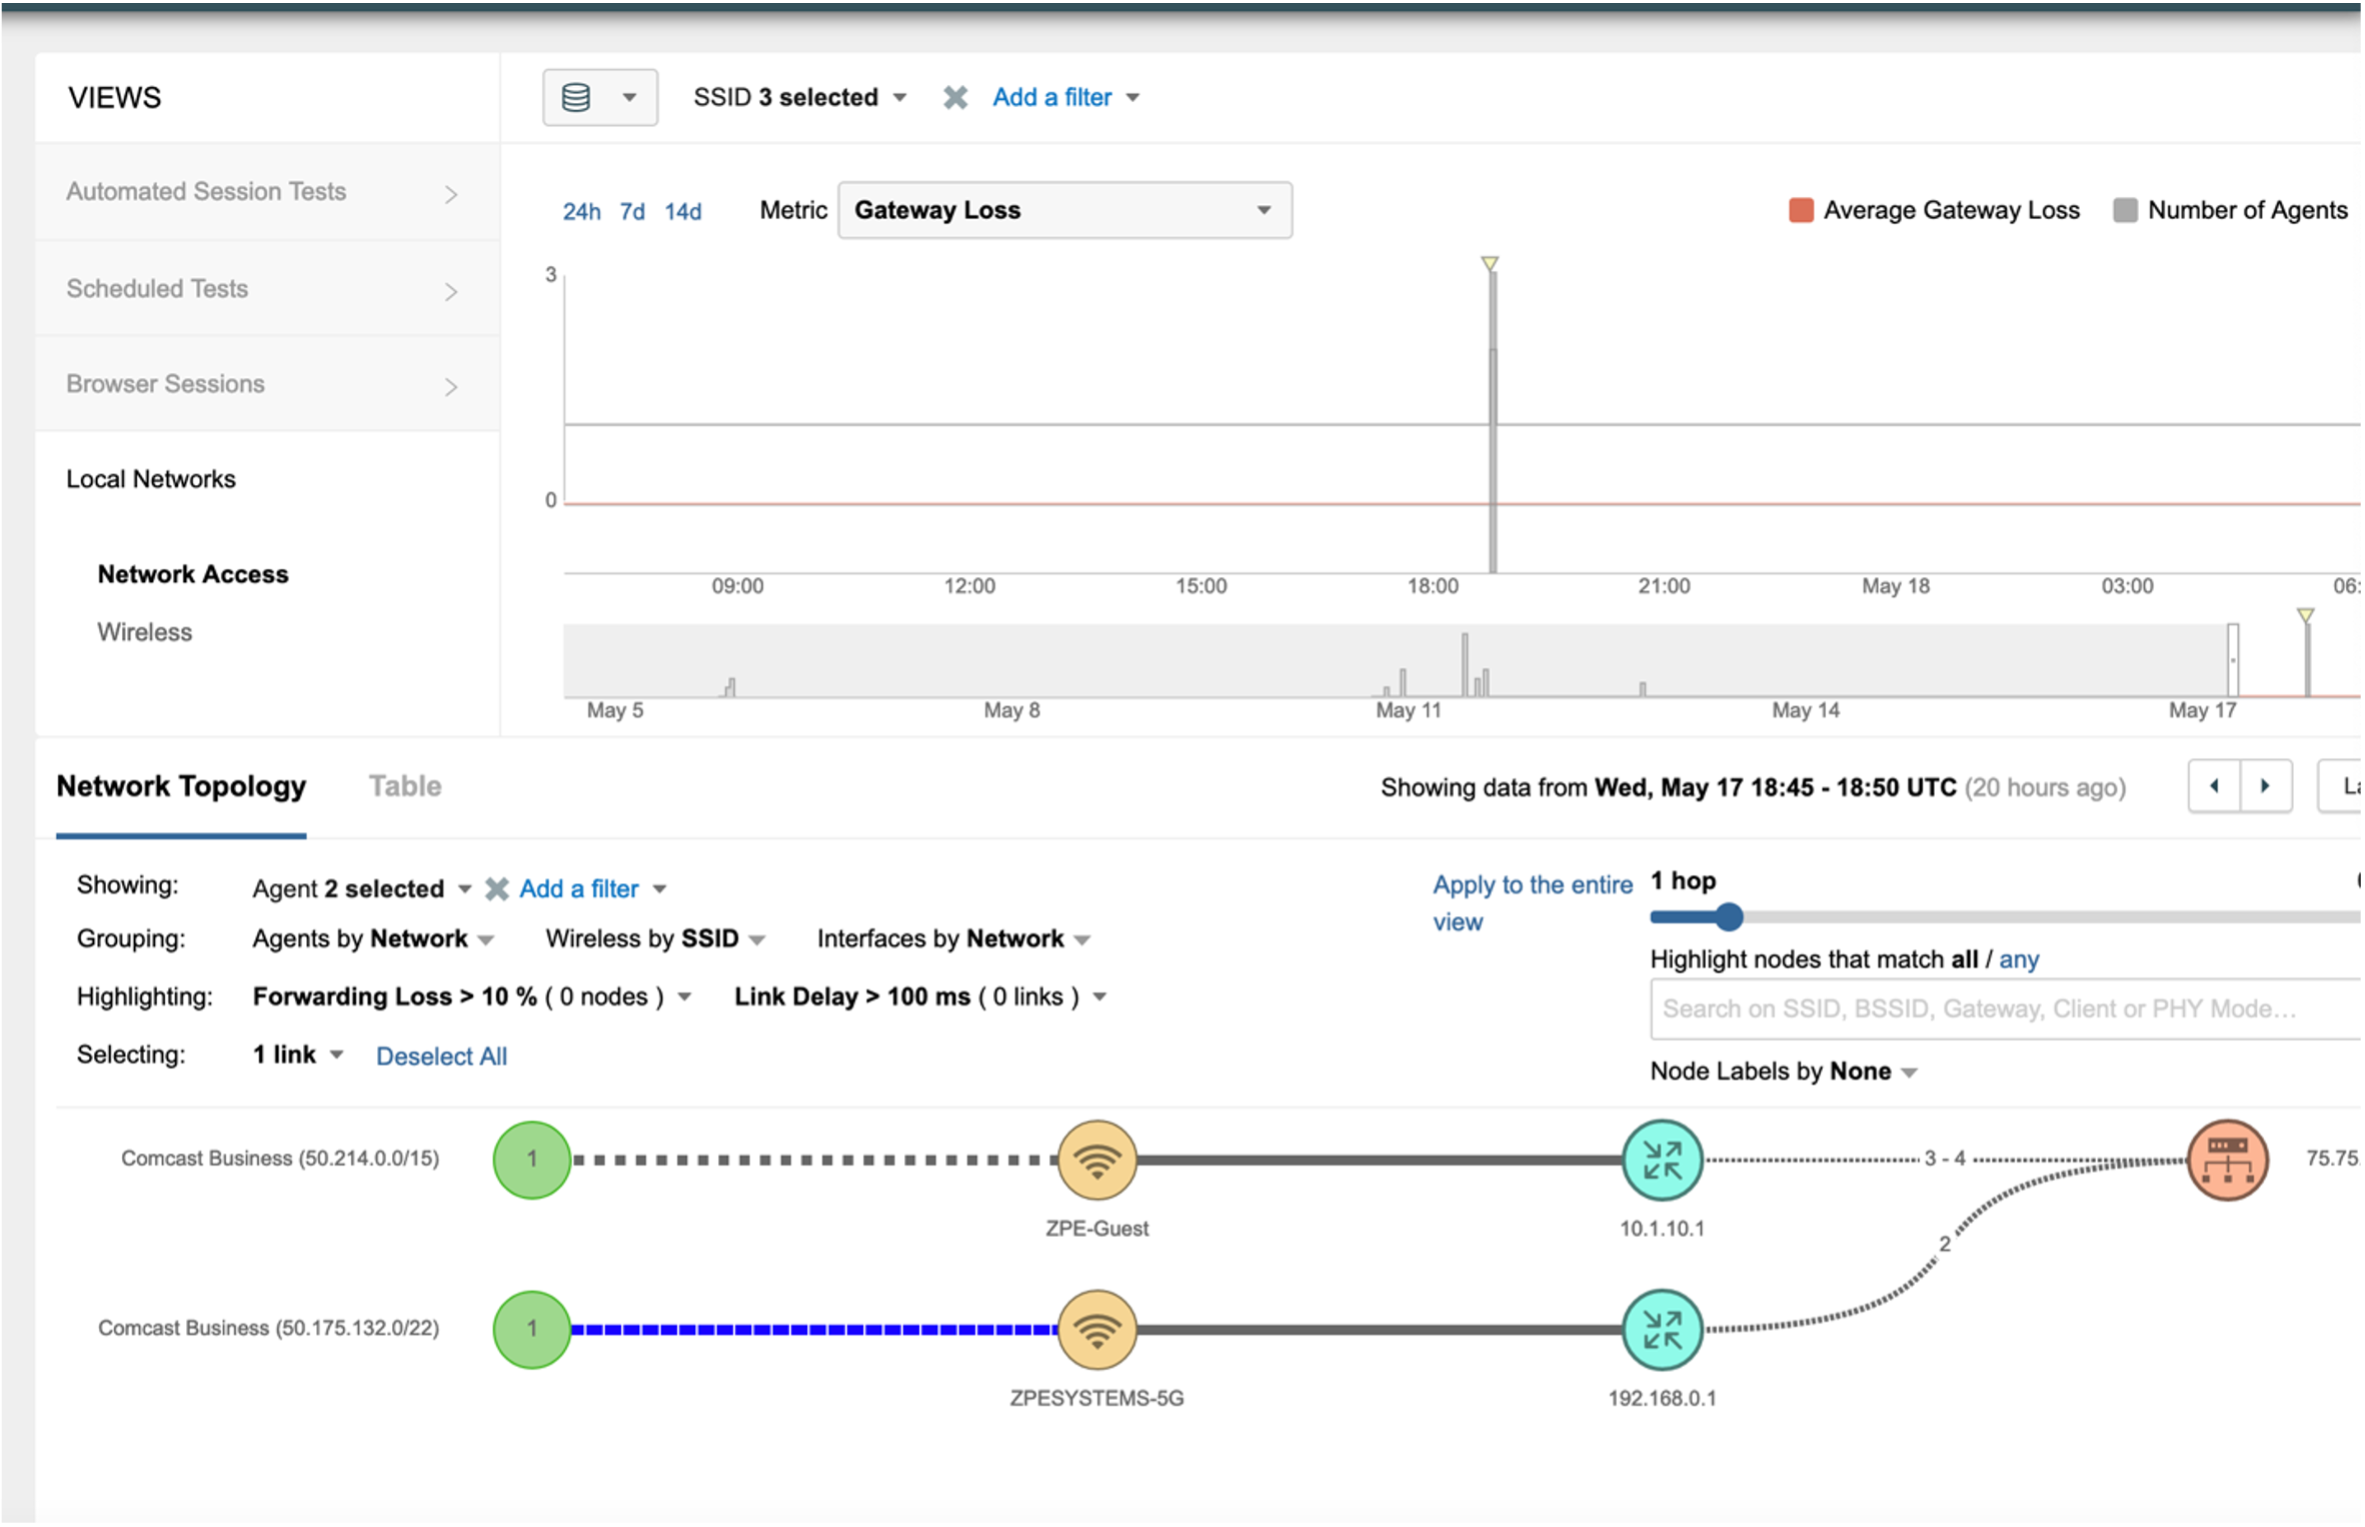
Validation of the scenario
Follow this procedure:
- Define a view through the Local Networks portion of the ThousandEyes web application: