This sets up 2-factor authentication (2FA) with RSA or OTP methods. 2FA requires Nodegrid to pair with an external service that provides the corresponding method. The service is consulted at each login for users with 2FA enabled.

Add 2-Factor Configuration
- Go to Security :: Authentication :: 2-Factor.
- Click Add (displays dialog):
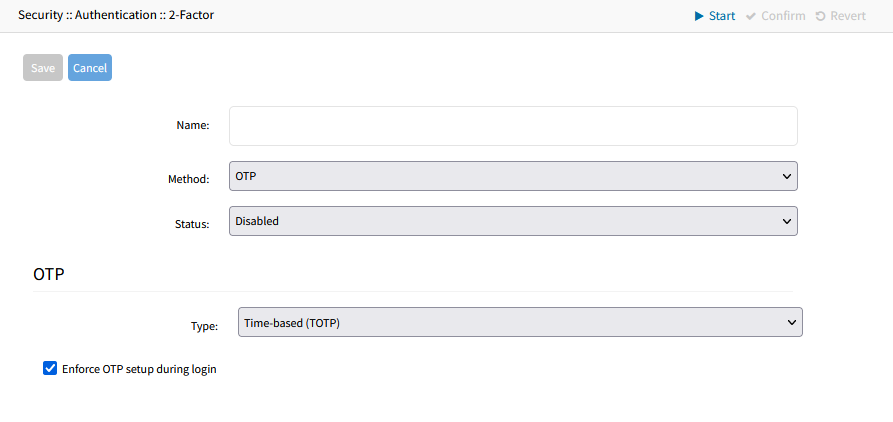
- Enter Name as an arbitrary identifier.
- On Method drop-down, select one (OTP, RSA). Dialog changes.
- On Status drop-down, select one (Enabled, Disabled). The authentication method will only apply when Enabled.
- If configuring the OTP method (see additional steps in the "Configure OTP for a user" section below):
- OTP (One-Time Password) 2FA works by setting up an initial pairing between a Nodegrid user and an external service supporting the chosen Type (such as Google Authenticator, Microsoft Authenticator, Free OTP, etc.). After the initial pairing, upon each login, the user with OPT configured will be required to enter their password as well as a code provided by the external authenticator service.
- Select a Type depending on the external authenticator service selected:
- Time-based (TOTP): the provided code is time-sensitive, changing periodically
- Counter-based (HOTP): the provided code changes at every use, and only when used
- Choose whether or not to Enforce OTP setup during login. If selected, all users will be prompted and forced to setup OTP on their next login. If not selected, users can choose to setup OTP on the "Change Password" screen.
- If configuring the RSA method (see additional steps in "Configure RSA SecurID (2-Factor)" section below):

- Enter Rest URL.
- Select Enable Replicas checkbox (expands dialog). Enter Replicas.

- Enter Client Key.
- Enter Client ID.
- Select Enable Cloud Authentication Service checkbox (expands dialog).

- Enter Policy ID.
- Enter Tenant ID.
- Enter Read Timeout [seconds] (default: 120).
- Enter Connect Timeout [seconds] (default: 20).
- Enter Max Retries (default: 3).
- Click Save.
Configure OTP authentication for a user
- Add and enable an OTP authentication provider (see "Add 2-Factor Configuration" above for the OTP method)
- Go to Security :: Authentication :: Servers and set the 2-Factor Authentication option of the local server to the configured OTP provider (see Authentication tab / Servers sub-tab, Edit Local Authentication)
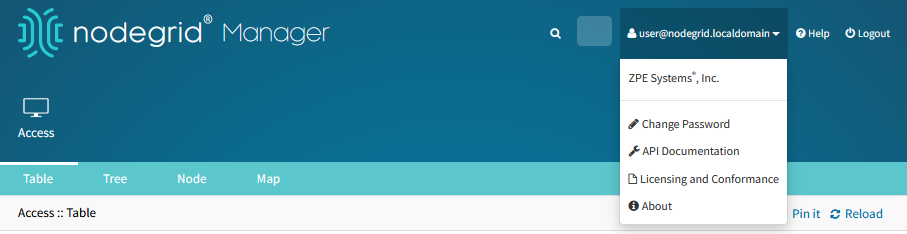
- Login as the user that will configure 2FA
- Click on user@nodegrid.localdomain at the top banner, and select Change Password:
- Click on Generate OTP Token
- Note: if clicking on Reset OTP Token, the current configuration will be erased and a new one will not be set. Useful for enforcing a new setup at next login.
- Follow the instructions on the dialog (shown below)
- If OTP is enforced at login, this dialog will also be shown when the user tries to login
- If desired, note down the "Emergency scratch codes". These can be used instead of an OTP, but only once per code

- Upon each new login, after correctly entering their password, the user will be prompted for an OTP verification code:
.png) The same applies to CLI:Shell
The same applies to CLI:Shell
And API:$ ssh test@nodegrid (test@nodegrid) Password: (test@nodegrid) Verification code:Pythonurl = f'https://{NG_IP}/api/v1/Session' headers = {"Content-Type": "application/json", "accept": "application/json"} data = f'{{ "username": "{USERNAME}", "password": "{PASSWD}", "verification_code": "824584" }}' requests.post(url, data=data, headers=headers, verify=False) - (Optional) System administrators can reset any user's OTP tokens using the Reset OTP Token button in Security :: Local Accounts:

Configure RSA SecurID (2-Factor)
Step 1 – Add SecurID (WebUI Procedure)
- Go to Security :: Authentication :: 2-Factor.
- Click Add.
- On the Add dialog, enter Name (name to identify the SecurID system, i.e., SecurID)
- Enter Rest URL (URL to access the SecurID Authentication API – format: https://5555/mfa/v1_1/authn).
- Enter Enable Replicas(Rest Service URL to failover to the server (up to 15 replicas). One per line).
- Enter Client Key (available through RSA Security Console. Copy/paste the Access Key from the SecurID Security Console. The Access Key is also available at RSA SecurID Authentication API (under System Settings).
- Enter Client ID (retrieve the Server Node name from the Authentication Manager Contact List.).
- Select the Enable Cloud Authentication Service checkbox:
- Enter Policy ID: Enter the name of the access policy you want to authenticate with as specified in the RSA Cloud Administration Console.
- Enter Tenant ID: Enter the RSA Cloud Authentication Service Company ID.
- Click Save.
Step 2 – Set Certificate to access SecurID Server (WebUI Procedure)
- If the RSA server is through ZPE Cloud Authentication, go to RSA SecurID Access and click the Lock icon (next to the URL).
- Locate and click on the Certificate.
- Click the first/top certificate on the pop-up dialog, and drag it to your desktop.
- Upload certificate to Nodegrid (certificate is automatically converted to the expected format).
- If not via ZPE Cloud:
- Go to the RSA Operations Console.
- Download the Signing Root Certificate.
- Go to Security :: Authentication :: 2-Factor.
- Click the link representing the SecurID server (added above).
- Click Certificate.
- Select Local Computer checkbox. Click Choose File and select the file (i.e. RootCA.cer file).
- Click Apply,
- Click Save.
Edit 2-Factor Configuration
- Go to Security :: Authentication :: 2-Factor.
- In the Name column, click the name to be updated (displays dialog).
- Make changes, as needed.
- Click Save.
Delete 2-Factor Configuration
- Go to Security :: Authentication :: 2-Factor.
- Locate and select the checkbox.
- Click Delete.
- On the confirmation dialog, click OK.
Assign 2-factor to an Authentication Method
RSA SecurID 2-factor authentication can be added to any Nodegrid-supported authentication method: Local, LDAP/AD, Radius, TACACS+, or Kerberos.
Nodegrid authenticates users following the order of the authentication servers, as configured. When a method succeeds (user authenticated), Nodegrid initiates the 2-factor authentication (if configured).
The user receives a request from RSA SecurID to provide the token code and PIN (according to the setup on the user’s RSA Security Console). The process is applied on user login via Web Browser, SSH, Telnet or Console port.
RSA Authenticate App
This applies only to ZPE Cloud Authentication Services. 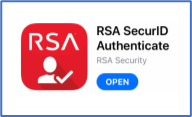
- Download the RSA SecurID Authenticate app.
- Go to RSA SecurID Access and login.
- Follow the steps to register the device.