Border Gateway Protocol (BGP) is a standardized exterior gateway protocol that exchanges routing information between different autonomous systems (ASes) on the Internet. This section explains the tasks to configure a BGP network for a Nodegrid device. To Configure BGP routing for a Nodegrid device, perform the following configurations:
Prerequisite
Before configuring the BGP router, make sure that the IPv4 and IPv6 forwarding are enabled. To enable IPv4 and IPv6 forwarding, go to Network:: Settings:: IPv4 and IPv6 profile and select the checkboxes Enable IPv4 IP Forward and Enable IPv6 IP Forward.
Adding a BGP Router
To initiate the BGP routing process, you must add a BGP router. To configure the BGP router:
Log in to the Nodegrid OS Manager
Go to the NETWORK::ROUTING::BGP page and click Add
.png)
Enter the AS number corresponding to the router's autonomous system
Enter the BGP Router ID. The router ID should be a unique 32-bit IPv4 address. This ID uniquely identifies the router within the BGP domain and helps to identify the BGP neighbors
Specify the time duration of the Keepalive interval and hold time for BGP neighbors
The minimum Keepalive interval is 0 to 65535 seconds. The hold time interval is 0 to 65535 secondsSelect the Status as Enabled
Select virtual routing and forwarding (VRF) as Default.
Select eBGP Requires Policy if you want to apply incoming and outgoing policies to the eBGP sessions. Without incoming policies, no routes will be accepted and without outgoing policies, no routes will be advertised. This option is enabled by default
Click Save. The newly created router is listed in the table
The BGP router is now configured, and you will be able to see options to configure neighbor groups, neighbors, networks, and redistribution
CLI Configuration Example
[admin@nodegrid /]# cd /settings/routing/bgp
[admin@nodegrid bgp]# add
[admin@nodegrid {bgp}]# set as_number=1
[admin@nodegrid {bgp}]# set router_id=20.1.1.33
[admin@nodegrid {bgp}]# commit
Configuring the Neighbors
BGP routers establish TCP sessions with neighboring routers to exchange routing information. The BGP neighbors play a crucial role in maintaining accurate routing within autonomous systems, ensuring proper connectivity. To establish a connection between the BGP neighbors, you must configure the parameters as mentioned in the following procedure:
Click on the router entry from the table and click Neighbor
Click Add to configure a new BGP neighbor
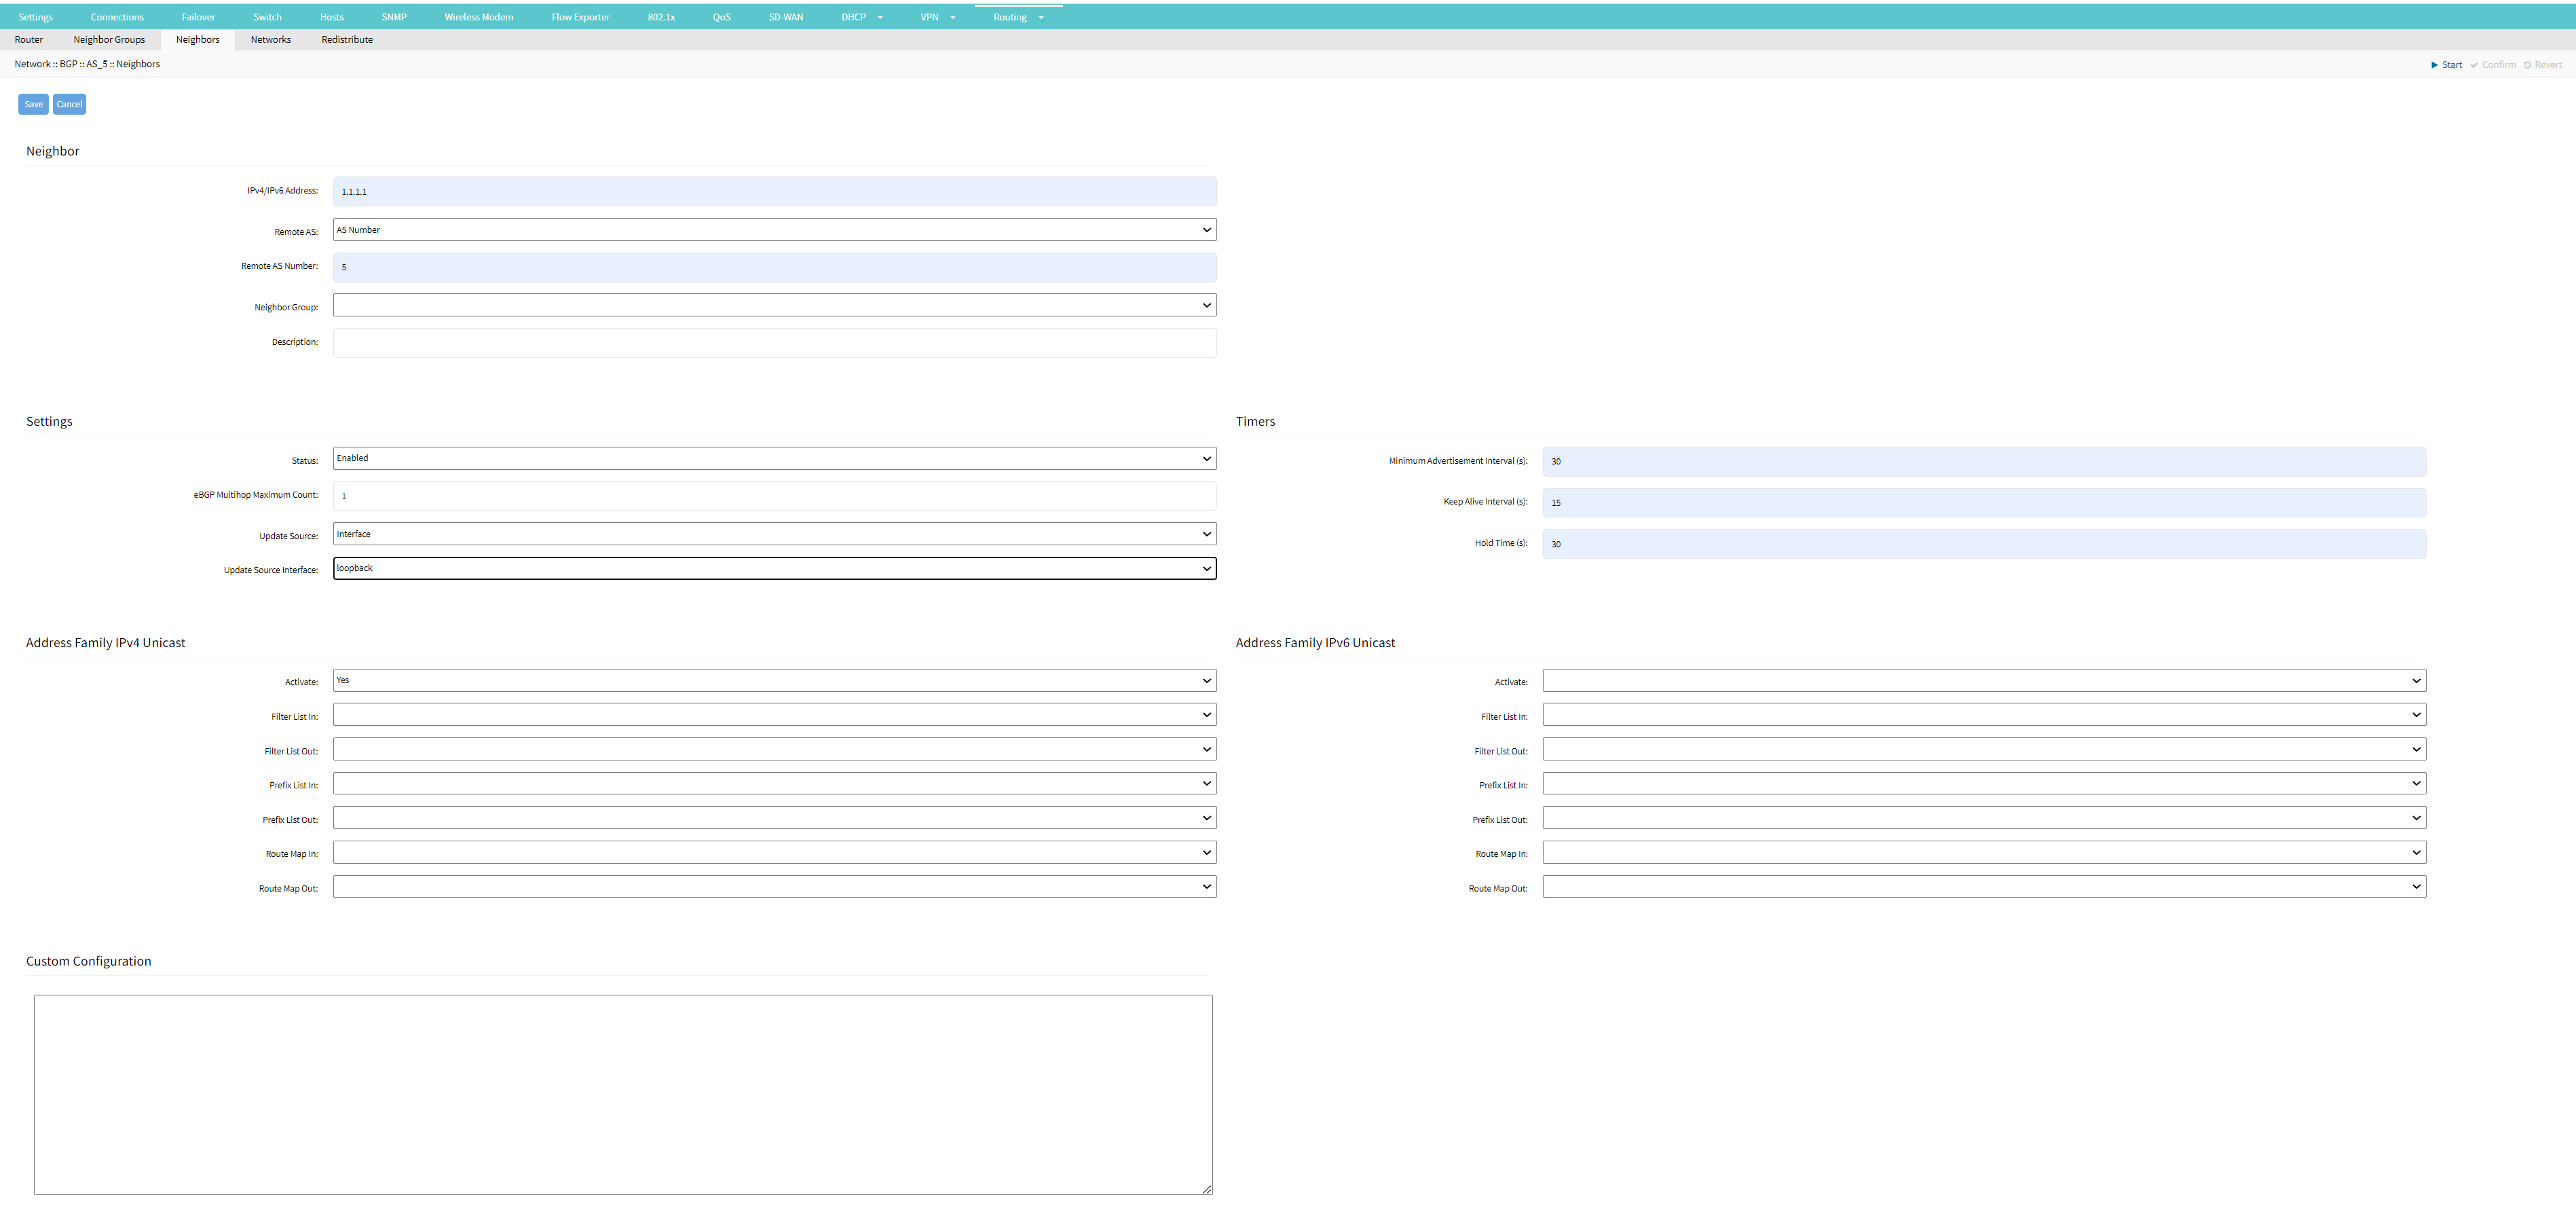
Configure the following neighbor parameters:
Specify the IP address of the neighbor
Select the Autonomous System number of the neighboring BGP router with which you are establishing a BGP neighbor session
Select the AS number if you want to assign a numerical identifier to the autonomous system of the neighboring BGP router
Select External if the neighbor with which you are establishing the connection is an external BGP router. When you have selected this option and if the AS number is identified in the local autonomous system the connection gets rejected
Select Internal if the neighbor with which you are establishing the connection is an internal BGP router. When you have selected this option and if the AS number is identified in the local autonomous system the connection gets accepted
Select the neighbor group from which you want to replicate the configuration policies for this specific neighbor
Specify a meaningful description of the neighbor. This description assists network administrators in understanding the neighbor's role in a network topology
Configure the following settings:
Select if the BGP session with the specified neighbor is enabled or disabled
Specify the maximum hop count to establish BGP sessions with the neighbors that are not directly connected. Note that the more the hop count the lesser the network latency
Specify the source address of the interface or the interface type to reach the neighbor. A BGP connection can be established if there are active paths between the neighbors. If there are multiple paths between the neighbors specifying the update source initiates the Nodegrid device to establish the BGP peering itself through that interface or the source IP
Configure the following timer settings:
Specify the minimum router advertisement interval (per neighbor). BGP determines the interval determines the time gap between sending route advertisements or withdrawals to a BGP neighbor. The duration can be a maximum of 30 seconds
Specify the time duration between consecutive Keepalive messages sent by the BGP router to its neighbors. The duration can be from 10 to 60 seconds; however, it must not exceed half of the time set as the Hold time
Specify the maximum time duration that a BGP router should wait to receive a Keepalive message from its neighbor. The duration can be from 30 to 90 seconds
Configure the IPv4/IPv6 address families.
Specify which address families should be exchanged with neighbors that support the same address families. You could activate an address family to select that address family for a BGP neighbor. If you are defining an IPv4/IPv6 unicast neighbor, you exchange the IPv4/IPv6 unicast routes with that neighbor. Additionally, you can set up filter lists, prefix lists, and route maps, to specify which routes should be accepted from or advertised to specific neighborsA list of available neighbors is displayed in a tabular format. The table shows the following details:
ID: Neighbor ID, which is IPv4 or IPv6 address of the router
Status: Enabled or Disabled status of the neighbor
Remote AS: AS system number of the neighbor
Neighbor Group: The Group to which the neighbor belongs. See the Neighbor Groups section for more information. The configurations defined in the Neighbor Groups are inherited by all the neighbors of the group. This is useful if you have the same configuration for multiple neighbors
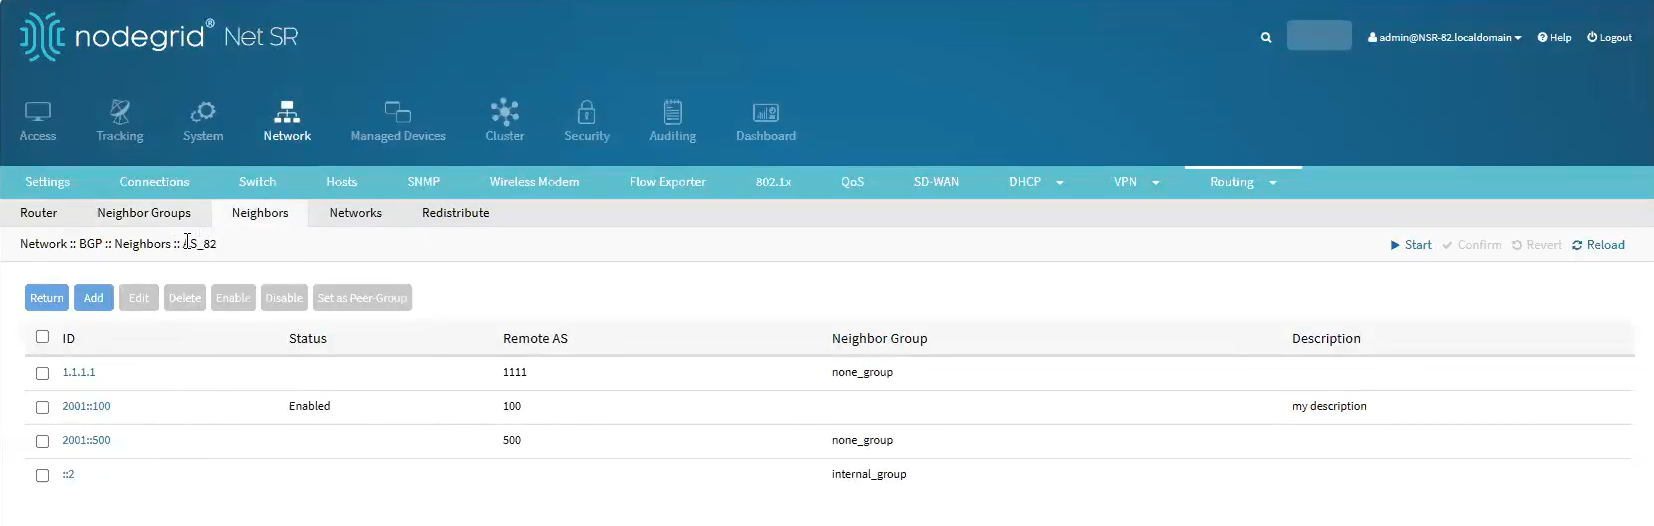 You can set a neighbor as a peer group by clicking the Set as Peer Group option. Setting a neighbor as a peer group includes it in the Neighbor Groups as peers share the same update policies.
CLI Configuration Example
[admin@nodegrid routing]# cd bgp
[admin@nodegrid bgp]# cd 1-default/
[admin@nodegrid 1-default]# cd neighbor
[admin@nodegrid 1-default]# add
[admin@nodegrid {neighbors}]# set ip_address=10.1.1.33
[admin@nodegrid 10.1.1.33]# set remote_as=as_number
[admin@nodegrid 10.1.1.33 ]# set remote_as_number=10
[admin@nodegrid 10.1.1.33 ]# set description=testing
[admin@nodegrid 10.1.1.33 ]# set status=enabled
[admin@nodegrid 10.1.1.33 ]# set ebgp_multihop_maximum_count=10
[admin@nodegrid 10.1.1.33 ]# set update_source=interface
[admin@nodegrid 10.1.1.33 ]# set update_source_interface=backplane0
[admin@nodegrid 10.1.1.33 ]# set minimum_advertisement_interval=30
[admin@nodegrid 10.1.1.33 ]# set keep_alive_interval=60 hold_time=100
[admin@nodegrid 10.1.1.33]# set ipv4_unicast_activate=yes
[admin@nodegrid 10.1.1.33]# commit
Setting up the Neighbor Groups
You can set up neighbor groups with the same set of configurations to simplify and effectively update the configurations. This approach simplifies the configurations in cases where there are many neighbors.
Click on the router entry from the table and click Neighbor Groups
Click Add
Specify a neighbor group name
Under Group Members, choose the member you want to include in the group and click Add. To remove a member from the group, select the member and click Remove
Configure the necessary parameters that you want to apply to all members of the group. Refer to the procedure Configuring the Neighbors for information on configuration parameters.
Click Save
Note:
After you include a member in a group, you can also override the configuration settings for that member by navigating to the Neighbors tab.
CLI Configuration Example
[admin@BSR-80 /]# cd /settings/routing/bgp/1-default/neighbor_groups/
[admin@BSR-80 neighbor_groups]# add
[admin@BSR-80 {neighbor_groups}]# set name=my_group
[admin@BSR-80 {neighbor_groups}]# set remote_as_number=10
[admin@BSR-80 {neighbor_groups}]# set description="My group description"
[admin@BSR-80 {neighbor_groups}]# set members=10.1.1.33
[admin@BSR-80 {neighbor_groups}]# set status=enabled
[admin@BSR-80 {neighbor_groups}]# set ebgp_multihop_maximum_count=5
[admin@BSR-80 {neighbor_groups}]# set update_source=interface
[admin@BSR-80 {neighbor_groups}]# set update_source_interface=backplane0
[admin@BSR-80 {neighbor_groups}]# set keep_alive_interval=30
[admin@BSR-80 {neighbor_groups}]# set hold_time=90
[admin@BSR-80 {neighbor_groups}]# set ipv4_unicast_activate=yes
[admin@BSR-80 {neighbor_groups}]# commit
Configuring BGP Network Parameters
You need to specify the IPv4 or IPv6 routes that need to be advertised by the BGP routers to ensure routing information propagates via the network. To configure the network settings, follow these steps:
Enter the IP prefix of the device. The IP prefix allows the advertising of the device to its neighbors
Select the IPv4 unicast or IPv6 unicast address family from the drop-down
Select the route map for the inbound or the outbound routes. Route maps can be used to set the filters for the routes or to redistribute routes to avoid loops when the same routes are advertised
(optional) Enter the label index number identifier for the route
Select the checkbox Backdoor Route to route a network through the backdoor route. Applicable for IPv4 Unicast address type only. The backdoor route and the local route are the same except that the backdoor route IPs are not advertised
Click Save
CLI Configuration Example
[admin@nodegrid {networks}]# cd /settings/routing/bgp/80-default/networks/
[admin@nodegrid networks]# add
[admin@nodegrid {networks}]# set ip_prefix=10.1.1.32
[admin@nodegrid {networks}]# set address_family=ipv4_unicast
[admin@nodegrid {networks}]# set label_index=100
[admin@nodegrid {networks}]# set backdoor_route=yes
[admin@nodegrid {networks}]# commit
Configuring Route Redistribution
BGP routes can advertise routes to the neighbors that are learned by other routing protocols. Follow these steps to set the redistribution parameters:
Select the routing protocol to be used during the route redistribution
Select the IPv4 unicast or IPv6 unicast address family from the drop-down
Select the route map for the inbound or the outbound routes. Route maps can be used to set the filters for the routes or to redistribute routes to avoid loops when the same routes are advertised
Enter the metric attribute based on which the shortest path is selected for the routing purpose
Click Save
CLI Configuration Example
[admin@nodegrid /]# cd settings/routing/bgp/1-default/redistribute/
[admin@nodegrid redistribute]# add
[admin@nodegrid {redistribute}]# set protocol=ospf
[admin@nodegrid {redistribute}]# set address_family=ipv4_unicast
[admin@nodegrid {redistribute}]# set metric=10
[admin@nodegrid {redistribute}]# commit
Managing Route Configuration
You can edit, delete, enable, or disable BGP route configurations by choosing the corresponding configuration entry and selecting the appropriate options.