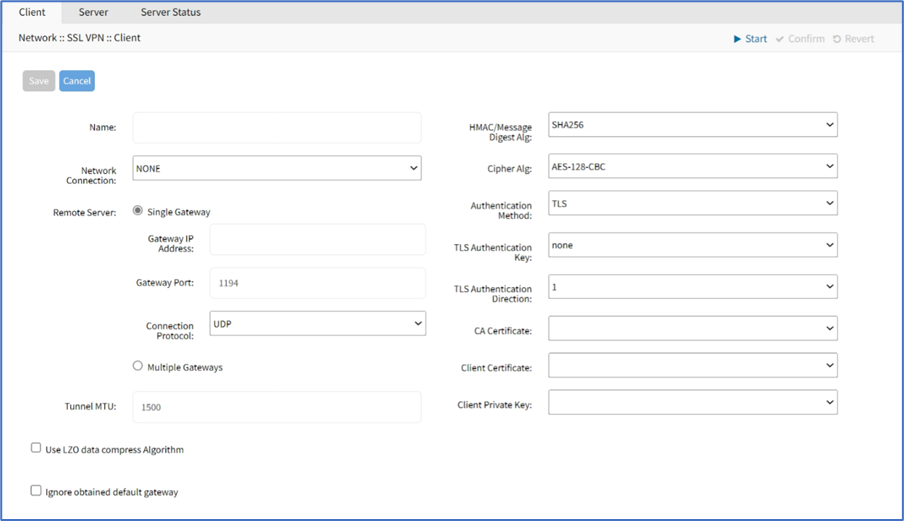
The VPN client configuration settings are generally used for failover scenarios. This is when a main secure connection fails over to a less secure connection type. The VPN tunnel is used to secure traffic. When the Nodegrid device is configured as an VPN client, it is bound to a network interface (optional) and the VPN tunnel is automatically established when the bounded interface starts. Multiple client configurations can be added that support different connection and interface details.
NOTE
Depending on the configuration, multiple files are required and must be available in the /etc/openvpn/CA folder.

Add Client
- Go to Network :: VPN drop-down :: SSL VPN :: Client.
- Click Add (displays dialog).

- Enter Name
- On Network Connection drop-down, select one (None, ETH0, ETH1, hotspot)
- In Remote Server menu, select one:
- Single Gatewayradio button, enter details:
- Gateway IP Address
- Gateway Port (default: 1194)
- Connection Protocol drop-down, select one (UDP, TCP)
- Gateway IP Address
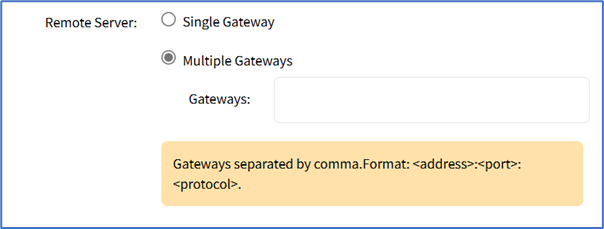
- Multiple Gateway radio button (expands dialog)

- Gateways (comma separated).
- Single Gatewayradio button, enter details:
- Enter details:
- Tunnel MTU (MTU size for tunnel interface) (default: 1500)
- Use LZO data compress Algorithm checkbox
- Ignore obtained default gateway checkbox
- HMAC/Message Digest Alg drop-down, select one
- Cipher Alg drop-down, select one
- On Authentication Method drop-down, select one.
- TLSselection
- TLS Authentication Key drop-down, select one
- TLS Authentication Direction drop-down, select one
- CA Certificate drop-down, select one
- Client Certificate drop-down, select one
- Client Private Key drop-down, select one
- Static Keyselection:
- Secret drop-down, select one
- Local Endpoint (Local IP)
- Remote Endpoint (Remote IP)
- Passwordselection:
- Username
- Password
- CA Certificate drop-down, select one.
- Username
- Password plus TLSselection:
- Username
- Password
- TLS Authentication Key drop-down, select one
- TLS Authentication Direction drop-down, select one
- CA Certificate drop-down, select one
- Client Certificate drop-down, select one
- Client Private Key drop-down, select one
- Username
- TLSselection
- Click Save.
Edit Client
- Go to Network :: VPN drop-down :: SSL VPN :: Client.
- On Subnet/Netmask column, click a name.
- Make changes, as needed.
- Click Save.
Delete Client
- Go to Network :: VPN drop-down :: SSL VPN :: Client.
- Select checkbox to be deleted.
- Click Delete.
Start Client VPN
- Go to Network :: VPN drop-down :: SSL VPN :: Client.
- Select checkbox next to client to be started.
- Click Start VPN.
Stop Client VPN
- Go to Network :: VPN drop-down :: SSL VPN :: Client.
- Select checkbox next to client to be stopped.
- Click Stop VPN.
Import OVPN
- Go to Network :: VPN drop-down :: SSL VPN :: Client.
- Click Import OVPN (displays dialog).

- Enter Name
- On Network Connection drop-down, select one (NONE, ETH0, ETH1, hotspot)
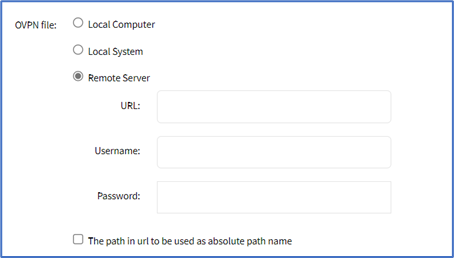
- In OVPN File menu, select one
- Local Computer radio button (expands dialog), click Choose File. Locate and select the file.
- Local System radio button (expands dialog). On OVPN filename drop-down, select one.

- Remote Server radio button (expands dialog), enter details:
 Enter URL (URL can be the IP address or hostname/FQDN. If using IPv6, use brackets [ ... ]. Supported protocols: FTP, TFTP, SFTP, and SCP.)
Enter Username and Password
(optional) Select The path in url to be used as absolute path name checkbox.
- Click Save.