This documentation aims to guide users to utilize ZPE Cloud collection effectively within Ansible playbooks for seamless configuration and management of Nodegrid devices. You can sequentially push multiple configurations without managing long lines of code. Administrators can use the Ansible playbook to write the tasks and use the Nodegrid collection and ZPE cloud collection to convert these tasks into CLI which is readable to ZPE Cloud and Nodegrid devices. This integration allows administrators to execute sequential profile configurations effortlessly, ensuring consistency and reliability across their network infrastructure.
Use the Nodegrid and ZPE Cloud collection to push profiles to execute system preferences and upgrade your Nodegrid devices. ZPE Cloud Ansible collection is supported on Ubuntu OS and Nodegrid OS.
How does it work?
Let us understand how the ZPE Cloud collection works in your automation platform.
In the automation platform, you need the following components:
Inventory: the list of Nodegrid devices associated with your ZPE Cloud. The inventory contains the list of available devices, enrolled devices, online devices, and offline devices
Nodegrid Collection: a set of ansible collections designed to manage and interact with the Nodegrid and its devices
ZPE Cloud Collection: a set of ansible collections designed to manage and interact with the Nodegrid and its devices
ZPE Cloud API: a set of API to establish a transport method for communicating with Nodegrid devices securely
Playbook: A sequence of tasks to be performed on the Nodegrid devices that are associated with your ZPE Cloud account
Understanding the workflow
To understand the workflow consider the following diagram.
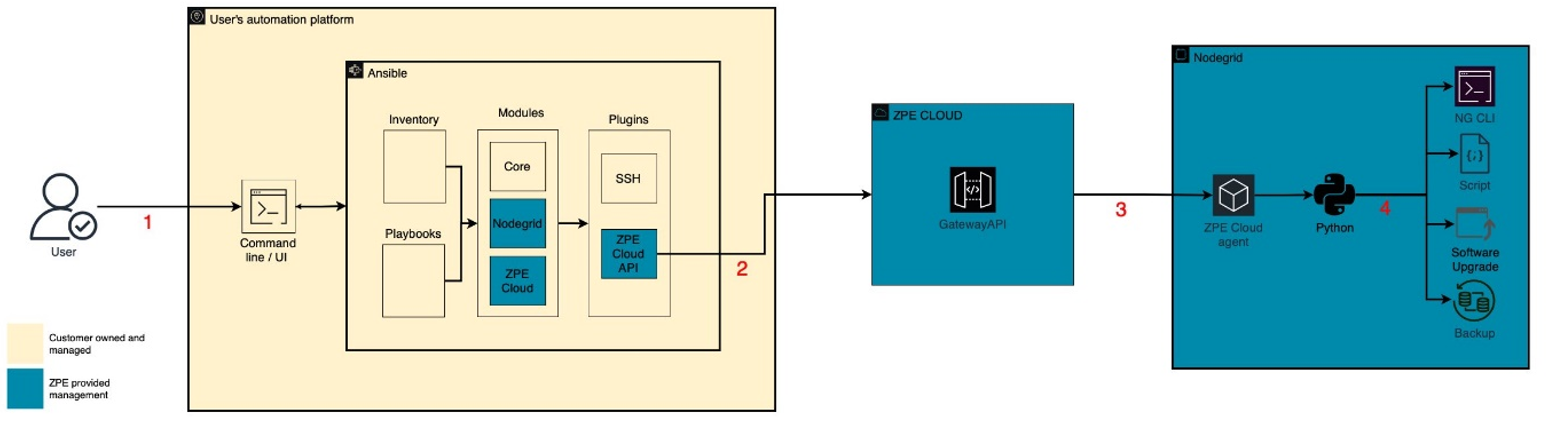
Step 1:
The customer creates a playbook that contains a sequence of tasks written in Ansible scripts.
The Nodegrid module translates Ansible tasks into CLI configuration commands compatible with the target devices.
The ZPE Cloud module facilitates cloud-based operations related to the network infrastructure.
The ZPE Cloud API plugin establishes a transport method for communicating with Nodegrid devices securely.
Step 2:
The connection plugin in Ansible utilizes the ZPE Cloud API for communication with the Nodegrid devices.
User authentication is required for accessing the ZPE Cloud API, ensuring secure communication via HTTPS protocol.
Step 3:
Each task received from Ansible is converted into corresponding profiles within the ZPE Cloud platform.
ZPE Cloud applies the generated script profiles to the target devices and retrieves the execution output upon completion.
Once the tasks are executed, the corresponding profiles are deleted from the ZPE Cloud platform for security and maintenance purposes.
Audit logs are generated for each action performed, ensuring accountability and traceability of operations.
Step 4:
The profile, converted into a Python script, executes within the Nodegrid device environment.
The Python script within Nodegrid interacts with CLI configurations performs software upgrades, applies backups, and other specified tasks.
Step-by-step Guide
To use the Nodegrid and ZPE Cloud Collection in your Automation platform, you must:
How to Install the Nodegrid Collection?
Perform the following actions to install the Nodegrid Collection:
Download the repository using the following command.
git clone https://github.com/ZPESystems/Ansible.gitEnter into the ansible directory.
cd AnsibleBuild the library using the script build.py.
python3 build.pyInstall the collection with ansible-galaxy
ansible-galaxy collection install -r build/collections/requirements.yml --force5. In the /etc/ansible/ansible.cfg file, define the key interpreter_python with the location of the Python interpreter. This is the minimal ansible.cfg recommended file content:
[defaults] interpreter_python = /usr/bin/python3 gathering = explicit host_key_checking = False [ssh_connection] ssh_args = -o ControlMaster=no -o ControlPersist=3600s -o PreferredAuthentications=publickeyOnce you install the Nodegrid Collection in your Automation platform, you must install the ZPE Cloud collection to access the ZPE Cloud features.
How to install the ZPE Cloud Collection?
The installation workflow involves the following steps:
Download and install the ZPE Cloud collection
Set up a dynamic inventory
Set up the connection plugin
Prerequisites
The Nodegrid Version 5.6.5 or higher is recommended.
An account with ZPE Cloud based on which the inventory is created.
A step-by-step guide to installing the ZPE Cloud collection:
Download and Install the collection:
On the Ansible controller install the ZPE Cloud collection:
ansible-galaxy install zpe.zpecloud
Set up a dynamic Inventory:
Set up the zpecloud dynamic inventory plugin by creating a file called zpecloud.yml in your ansible inventory folder. Provide the following details:
plugin: zpe.zpecloud.zpecloud_nodegrid_inventory
url: https://zpecloud.com
username: youruser@email.com
password: yourpassword
organization: yourcompanyname
If the URL field is left unassigned, then zpecloud.com is set as the default value.
The organization field is required only if the user has more than one organization associated with the account. This field is case-sensitive.
Test your inventory connection using the following command to display the list of available devices.
ansible-inventory --graph
Set up the connection plugin
After you set up the Inventory plugin, you need to set up the connection plugin by providing the same details as provided during the inventory setup. This plugin is used to access the ZPE Cloud API. In your ansible inventory folder create a group_vars folder and create a file called zpecloud_device_enrolled.yml and provide the following details."ansible_connection": zpe.zpecloud.zpecloud "ansible_zpecloud_username": "youruser@email.com" "ansible_zpecloud_password": "password" "ansible_zpecloud_organization": "yourcompanyname" # "ansible_python_interpreter": "/usr/bin/python3"You now have all the required components installed and can start creating and running a playbook.
How to Create and Run a Playbook
In this section, you will create a sample playbook executed against the online Nodegrid devices in the inventory and display the gathered default facts from the specific Nodegrid device.
Create a playbook
In your Ansible playbook directory, create the following sample playbook file called zpecloud_get_facts.yml using the following content.
name: Get Ansible Facts
hosts: zpecloud_device_online
gather_facts: True
tasks:
   - name: Display Systems Facts
debug:
   var: ansible_facts
Run a Playbook
Once you create a playbook, you can use the following command to run it.ansible-playbook zpecloud_get_facts.ymlLet us now look at other sample tasks that you can include in a playbook.
Other Sample Playbook Tasks
Playbooks can contain multiple tasks to configure different functionalities from Nodegrid. The following snippets describe each task inside the playbook.
Apply software upgrade to Nodegrid device via ZPE Cloud
Users can add software upgrade tasks to Ansible playbooks by adding the task zpe.zpecloud.software_upgrade. This module is provided inside the ZPE Cloud's Ansible collection.
This task contains the following two parameters:
version: Desired version of Nodegrid OS in the following format: <major>.<minor>.<patch> (for example, 5.10.10)
allow_downgrade: If true, permits Ansible to downgrade a device. This is a security flag to prevent devices from being downgraded by mistake, or factory resetting the box.
The following snippet presents a playbook that upgrades a device to Nodegrid version 6.0.3 via ZPE Cloud. If the device has a version greater than that, the execution will fail since the allow_downgrade field is set to false.
name: Copy a file from nodegrid
  hosts: "zpecloud_device_enrolled"
  gather_facts: no
  collections:
    - zpe.zpecloud
  tasks:
    - name: Apply software upgrade profile to device
      zpe.zpecloud.software_upgrade:
        version: "6.0.3"
        allow_downgrade: false
Update System Preferences
The following snippet updates the system settings such as hostname, ideal timeout, banner, and so on.
 name: Set system preferences
      block:
        - name: Set /settings/preferences
          zpe.nodegrid.system:
            preferences:
              show_hostname_on_webui_header: "yes"
              idle_timeout: "4321"
              enable_banner: "yes"
              banner: "{{ device_model }}"
              coordinates: "37.4769561,-121.9435728"
Enable Remote Access
The following snippet as the name suggests enables remote access to the Nodegrid device through the ZPE Cloud.
 name: Enable ZPE Cloud remote access
          zpe.nodegrid.import_settings:
            cmds:
              - "/settings/zpe_cloud enable_remote_access=yes"
Changing Hostname
The following snippet as the name suggests changes the hostname of the Nodegrid device:
name: Configure hostname
          zpe.nodegrid.network:
            settings:
              hostname: "{{ device_model }}"
These are some examples of the tasks you can execute in a playbook.
How to Verify the Tasks in ZPE Cloud?
Once you run a playbook and execute tasks, you can log in to the ZPE Cloud to know the details of jobs performed:
Log in to ZPE Cloud.
Go to PROFILES :: OPERATIONS. You can view the details of the jobs that are executed using the Ansible playbook.
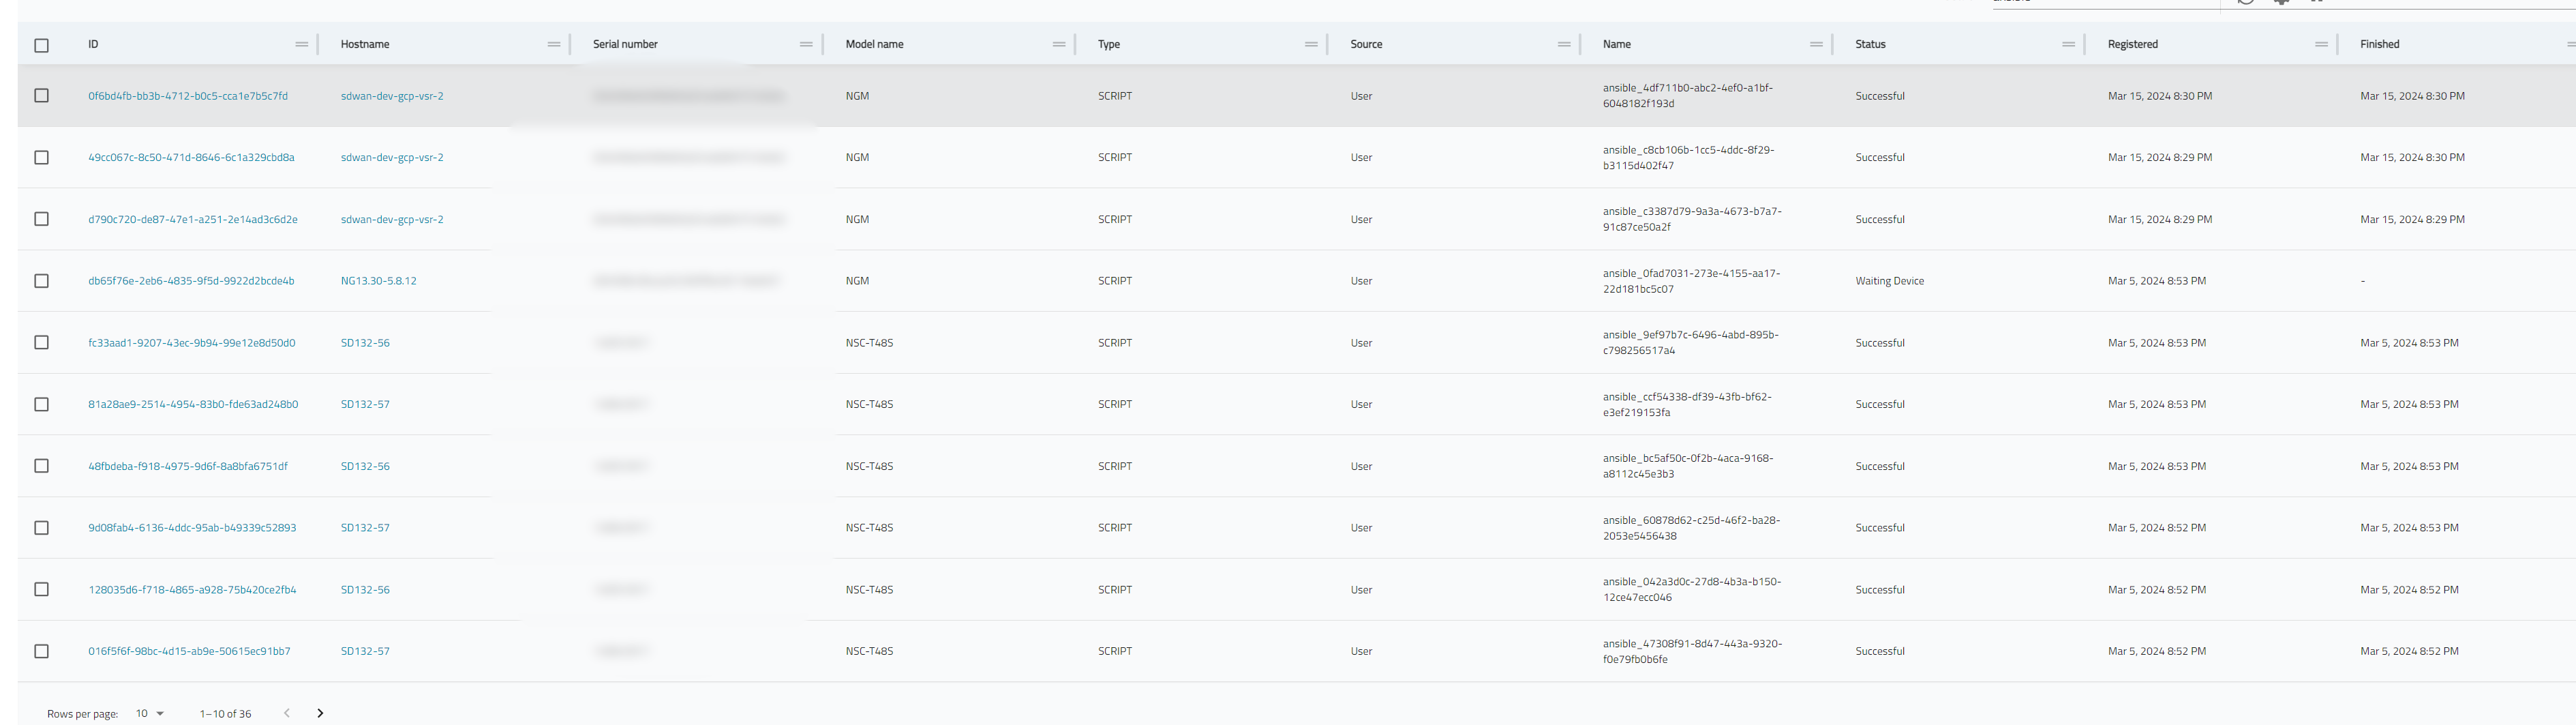
On this page, you can view details such as the model of the device, the serial number, the hostname, the type of operation, the status of the operation, the start time, and the end time of the operation. The detailed output of each script is displayed in the Ansible console while executing the playbook. This page will only show which scripts were executed on the device and whether they were executed successfully.