Understanding Zero-Touch Provisioning
Zero-Touch Provisioning (ZTP) is an automated process that simplifies and accelerates the deployment of your devices. Using ZTP, Nodegrid devices can automatically download and apply the required configurations and software updates from a remote server. With ZTP, you can configure and provision managed devices without manual intervention, significantly reducing the time and effort required for setup. The ZTP offers a streamlined solution when deploying new devices or when updating an existing device.
ZTP Process
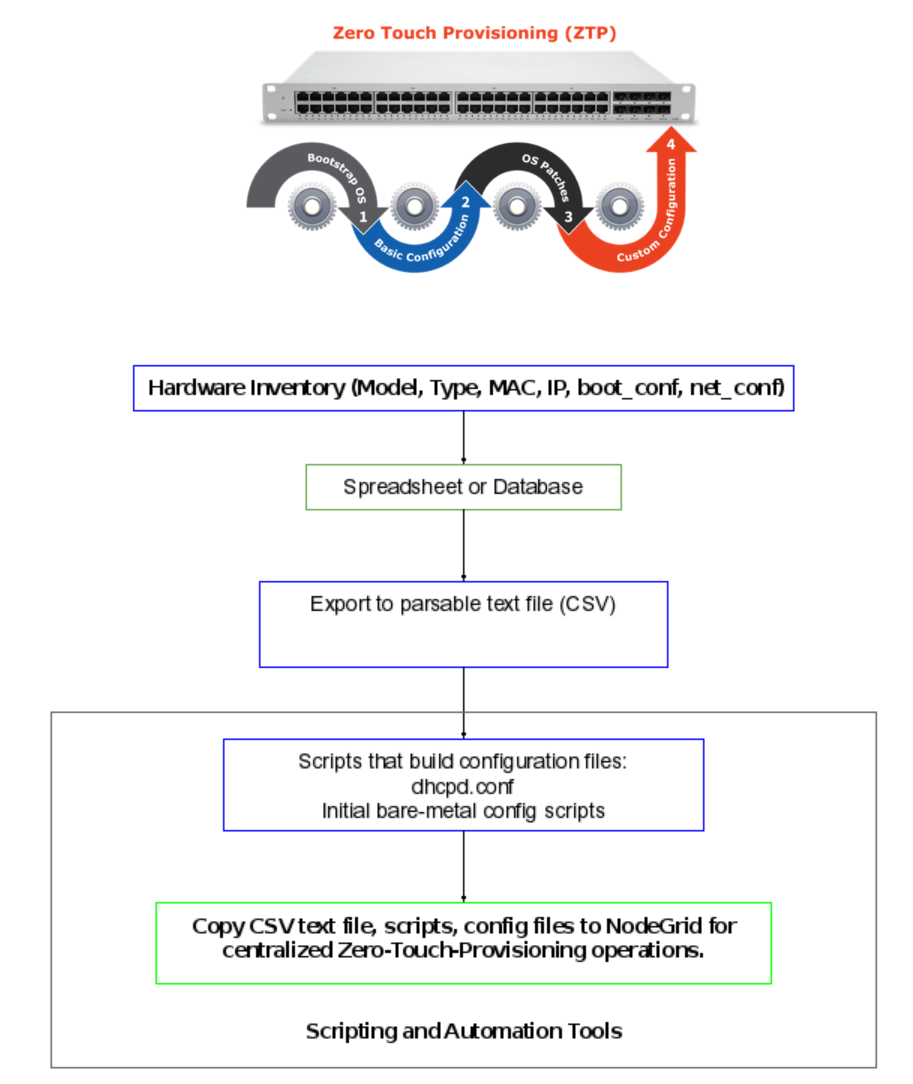
With ZTP, you streamline your installation and configuration process by creating an installation workflow. This workflow starts with an inventory of new network hardware, including:
The physical inventory
Data identification for each device
A method to export the inventory data
An automation tool (such as expect, pexpect, Ansible, Chef, Puppet, etc.)
A typical scenario involves having a list of MAC addresses from the network hardware manufacturer. Using these MAC addresses, you can plan and provision an inventory list in a database, spreadsheet, or exported CSV file. This file can be used to match managed devices, such as switches with their specific deployment configuration scripts. Using these scripts, you can create device-specific configurations and send requests to the remote server to download specific configuration files. Requests via HTTP, HTTPS, FTP, TFTP, SFTP, SSH, or SCP are supported by ZTP. You can provision different configurations based on the MAC address and/or model type of the network device.

In this model, the administrator begins by receiving the hardware and physically installing the device. This involves mounting and connecting the switch to both the console and Ethernet. After these physical connections are established, you need not interact with the device again for provisioning.
ZTP Provisioning for DHCP
The initial setup configuration is usually sent to the new switch through a console port session. On the Nodegrid, you can establish a console session via SSH using various methods, such as connecting to the serial console through the Nodegrid CLI, TCP port, or IP address alias. Once you have an open console terminal session, you can execute various automation processes to send the initial configuration to the switch. This initial configuration prepares the switch for a network boot or PXE boot. After completing the serial console configuration, you send a reboot command to the switch, allowing it to start up and receive its final configuration. For instance, once the managed device, such as a switch is powered on, it:
Uses standard network protocols to fetch everything necessary for provisioning.
Sends a DHCP query to obtain the appropriate IP address for connectivity and management.
Utilizes BootP/TFTP to download the correct operating system image.
Sends TFTP requests to retrieve the appropriate configuration file based on the application profile.
Implements signaling and timing mechanisms to handle transmission errors, unexpected messages, and manage response times as needed.
In this scenario, once you configures the IP address scheme on the DHCP server and sets up the Nodegrid OS and configuration files on the TFTP server, you can efficiently deploy multiple switches. This approach allows for full customization without the need for a time-consuming and error-prone manual configuration process.
ZTP relies on DHCP server vendor options to pass necessary parameters, similar to many other ZTP implementations. ZTP can operate on both IPv4 and IPv6. Nodegrid includes ZTP parameters in the options list of any DHCP discovery or request messages. This means the ZTP process will evaluate these parameters during the initial IP offer and any subsequent IP renewals. This approach allows ZTP to continuously enforce configuration and software versions, as well as run scripts at regular intervals for tasks such as monitoring and cleanup.
Nodegrid supports the following DHCP options. You can configure these DHCP options in the DHCP configuration file, /etc/dhcp/dhcp.conf or /etc/dhcp/dhcpd6.conf for IPv4 and IPv6 addressing respectively. A sample dhcp.conf is here.
Option | Option Number | Description |
|---|---|---|
space ‘name’ | - | Defines the list of options available for the space name, which will be in front of each of the options. |
‘name’.ztp-signature | 1 | ZPE specific ZTP process to execute. |
‘name’.ztp-server-url | 2 | URL link to where to download the files for ZTP (HTTP, HTTPS, FTP, TFTP, SFTP, SSH, or SCP). |
‘name’.ztp-image-filename | 3 | ISO filename for upgrade. |
‘name’.ztp-config-filename | 4 | CLI file to execute. |
‘name’.ztp-username | 5 | Username (if needed) for ztp-server-url. |
‘name’.ztp-password | 6 | Password (if needed) for ztp-server-url. |
‘name’.ztp-certificate | 7 | Certificate to use if needed for ztp-server-url. |
‘name’.ztp-script-filename | 8 | Script (Shell, Bash, Python…) to execute. |
‘name’.ztp-confirm-md5 | 9 | Values can be either yes or no. If set to yes, any changes to the files/scripts will trigger a re-execution. If set to no, re-execution will only occur if the file name is changed in the configuration. The default value is yes. |
‘name’.zpe-encapsulation | 43 | DHCP option code to use (Nodegrid uses DHCP option code 43). |
Configuring DHCP for a Nodegrid Device
You can configure your Nodegrid device both as a DHCP server and a client. As a DHCP server, the Nodegrid device assigns IP addresses and network settings to other devices on the network. As a DHCP client, the Nodegrid device requests and receives its IP address and settings from a DHCP server.
Nodegrid as a DHCP Server
This section provides the steps to configure the Nodegrid device as a DHCP server.
Web Configuration
Log in to the Nodegrid WebUI.

Navigate to Network::Connections.
Select the DHCP server interface.
Select Static in the IPv4 Mode.
Click Save.
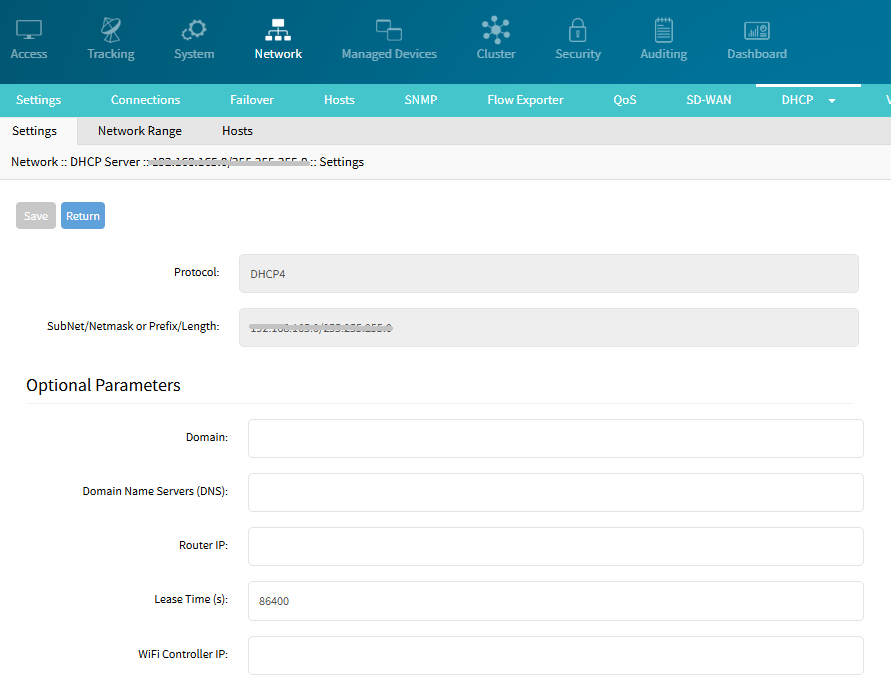
Configure the network interface by navigating to Network::DHCP.

Select Settings.
Enter the protocol and the subnet mask.
Click Save.
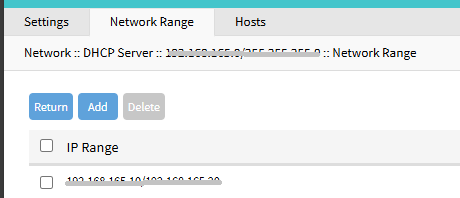
Configure the DHCP server network range by selecting Network Range.

Click Add and enter the DHCP IP range.
Click Save.
CLI Configuration
[admin@dhcp-server /]# cd /settings/network_connections/
[admin@dhcp-server network_connections]# add
[admin@dhcp-server {network_connections}]# set name=ETH2
[admin@dhcp-server {network_connections}]# set ethernet_interface=eth2
[admin@dhcp-server {network_connections}]# set description="DHCP Server"
[admin@dhcp-server {network_connections}]# set ipv4_mode=static
[admin@dhcp-server {network_connections}]# set ipv4_address=192.1.1.2
[admin@dhcp-server {network_connections}]# set ipv4_bitmask=24
[admin@dhcp-server {network_connections}]# set ipv4_gateway=192.1.1.1
[admin@dhcp-server {network_connections}]# set ipv6_mode=address_auto_configuration
[admin@dhcp-server {network_connections}]# commit
Nodegrid as a DHCP Client
This section provides the steps to configure the Nodegrid device as a DHCP client.
Web Configuration
Log in to the Nodegrid WebUI.
Navigate to Network::Connections.
Click Add.
Enter the following details:
Name: Specify the name of the Ethernet interface.
Interface: Select the interface type.
Description: Name of the DHCP client.
IPV4 Mode: Select DHCP.
Restart the interface (up_connection).
Check if this interface received an IP Address from the DHCP server.
Ping -I <dhcp-interface> <dhcp-server-ip> (in this case: ping -I eth2 192.1.1.2).
.png)
.png)
CLI Configuration
[admin@dhcp-client/]# cd /settings/network_connections/
[admin@dhcp-client network_connections]# add
[admin@dhcp-client {network_connections}]# set name=ETH2
[admin@dhcp-client {network_connections}]# set ethernet_interface=eth2
[admin@dhcp-client {network_connections}]# set description="DHCP Client"
[admin@dhcp-client {network_connections}]# set ipv4_mode=dhcp
[admin@dhcp-client {network_connections}]# set ipv6_mode=address_auto_configuration
[admin@dhcp-client {network_connections}]# commit
Sample DHCP Configuration File
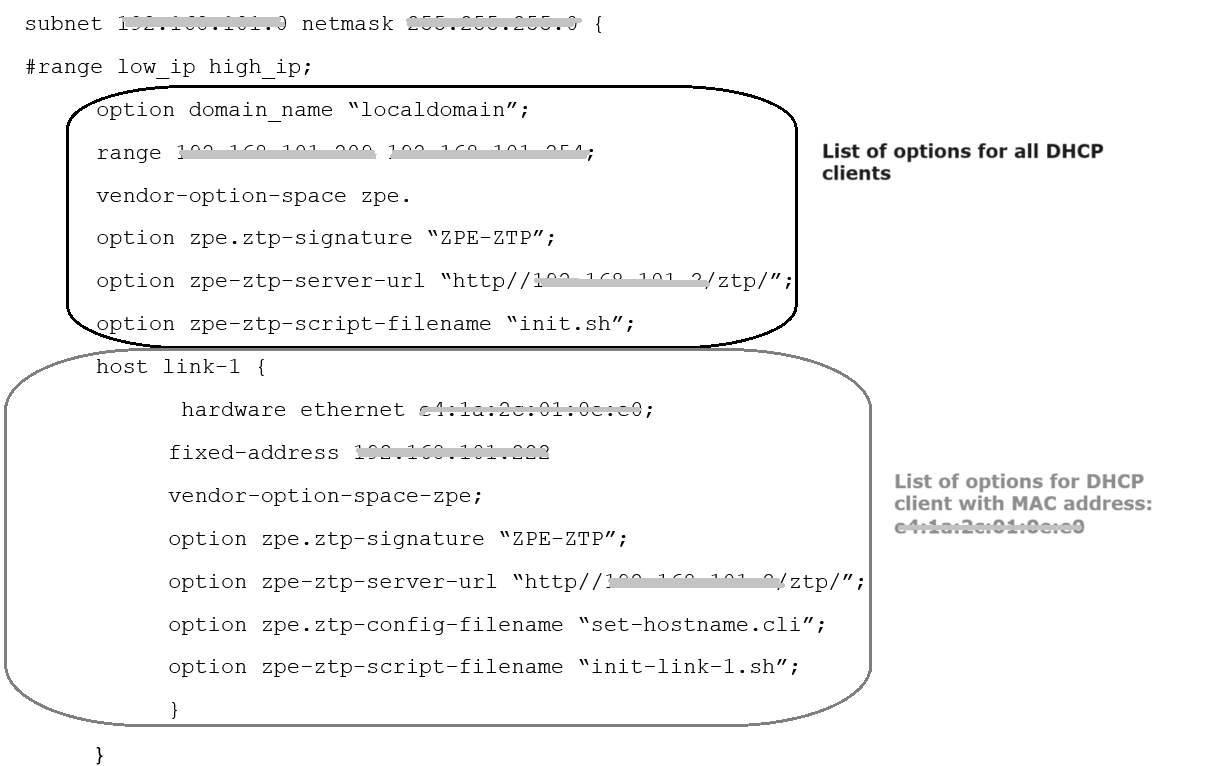
After you have set up the Nodegrid as a DHCP server, you can add the ZPE-specific information (DHCP options) to the DHCP configuration file. For example, the IPv4 addressing DHCP configuration file is at /etc/dhcp/dhcpd.conf. You can add the ZPE-specific options to the IP subnet range as indicated in the following example:

In this example, when the DHCP client host link-1 boots up, it contacts the DHCP server to obtain the configuration filename “set-hostname.cli” and the script filename “init-link-1.sh” from the Web server. The configuration file “set-hostname.cli” is as shown below:
set /settings/network_settings hostname=LINK-1
commit
Disabling ZTP
When all Ethernet interfaces are set with static IPs, ZTP functions will stop. ZTP can also be disabled by the following configuration:
set /settings/services/ enable_zero_touch_provisioning=noLog Files
The ZTP logs are stored in the file /var/zpt/ztp.log on your system (DHCP client system). This log file contains detailed records of the ZTP process, including events and errors encountered during the automatic setup and configuration of devices. By examining the ztp.log file, you can troubleshoot issues related to the ZTP process, monitor the provisioning status, and verify that devices are being correctly configured as expected.