This tab shows the list of Nodegrid devices enrolled in ZPE Cloud and allows applying actions to it. It also displays the device details.
NOTE
In the main table, when a Hostname checkbox is selected, additional device information is shown in the Device Details table (bottom of the page) and the actions such Apply Configuration, Software Upgrade, Backup and custom commands become enabled to be applied to the selected devices.
.png)
In the Connect column, if a device is configured for remote access, two buttons will appear:
Console: Launches the device via the command-line interface (CLI).
Web: Opens the device’s Web UI.
At the upper right, the Subscriptions Total / Used / Available section displays your current subscription status:
Total: The total number of subscriptions available.
Used: The number of subscriptions currently in use.
Available: The number of subscriptions remaining.
For information on how to enable remote access, see the section General Services.
Description of Buttons
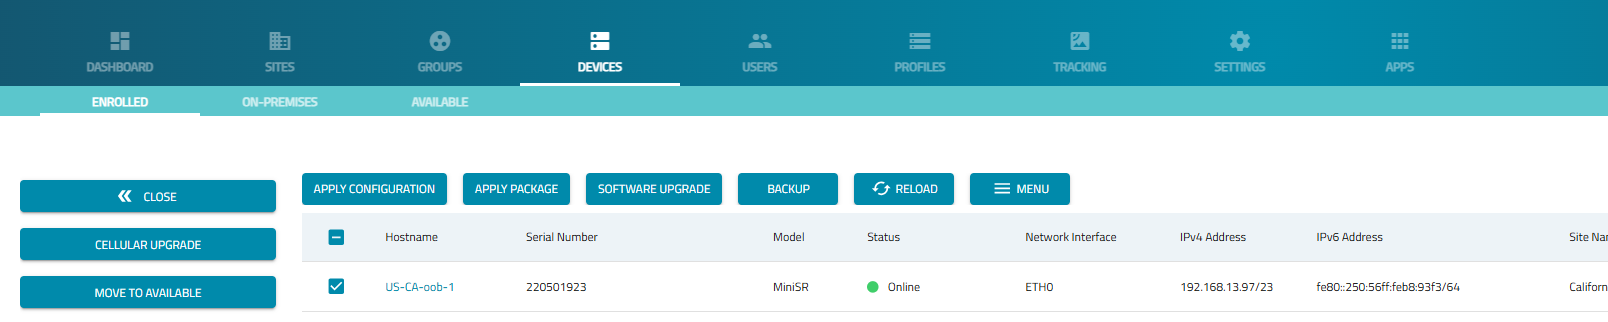
Click MENU to display additional side panel options:
APPLY CONFIGURATION – applies configuration to the selected device(s).
APPLY PACKAGE – displays Apply Package page (to select and apply a package to the selected device (v5.10+ only).
SOFTWARE UPGRADE – applies software upgrade to the selected device(s).
BACKUP – backs up the selected device(s).
RELOAD - refreshes the table contents.
MENU – expands side panel with additional buttons:
CLOSE button – closes side panel.
CELLULAR UPGRADE button – starts cellular upgrade process on the selected device(s).
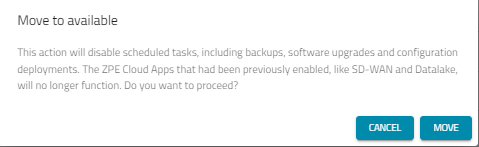
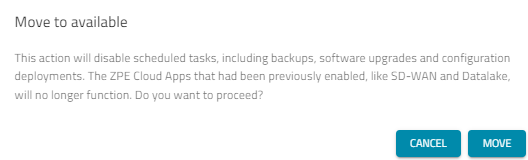
MOVE TO AVAILABLE button – moves selected device(s) to Available status.
CAUTION:
When a device is moved from the enrolled list to the available list, a message is displayed indicating that the tasks scheduled for that device are disabled.
Custom commands that can be applied to the selected device(s). For information on how to add a custom command, see the section Apply Custom Command to Device.
EOL Policies and Notices
With a focus on improving End of Life (EOL) and End of Support (EOS) messaging in ZPE Cloud, this section ensures users clearly understand device lifecycle status, associated risks, and upgrade requirements. The goal is to increase visibility, provide consistent alerts, and deliver timely guidance. These enhancements will streamline OS lifecycle management and reduce compliance risks.
OS Lifecycle
OS Compliance | OS Lifecycle |
|---|---|
Supported | Feature Support – New features, new hardware support, bug fixes and security updates. Maintenance Support – Only bug fixes and security updates. |
Announced End of Life | Security Support – Only critical bug fixes and critical security updates. |
End of Life | No further updates. |
End of Support | ZPE Systems’ technical support for the version is no longer available. |
Identifying OS Compliance
Device compliance can also be viewed in the ENROLLED page.
Log into ZPE Cloud as a user admin or operator
Go to the DEVICES::ENROLLED page
By hovering over the icons, the tooltip is displayed
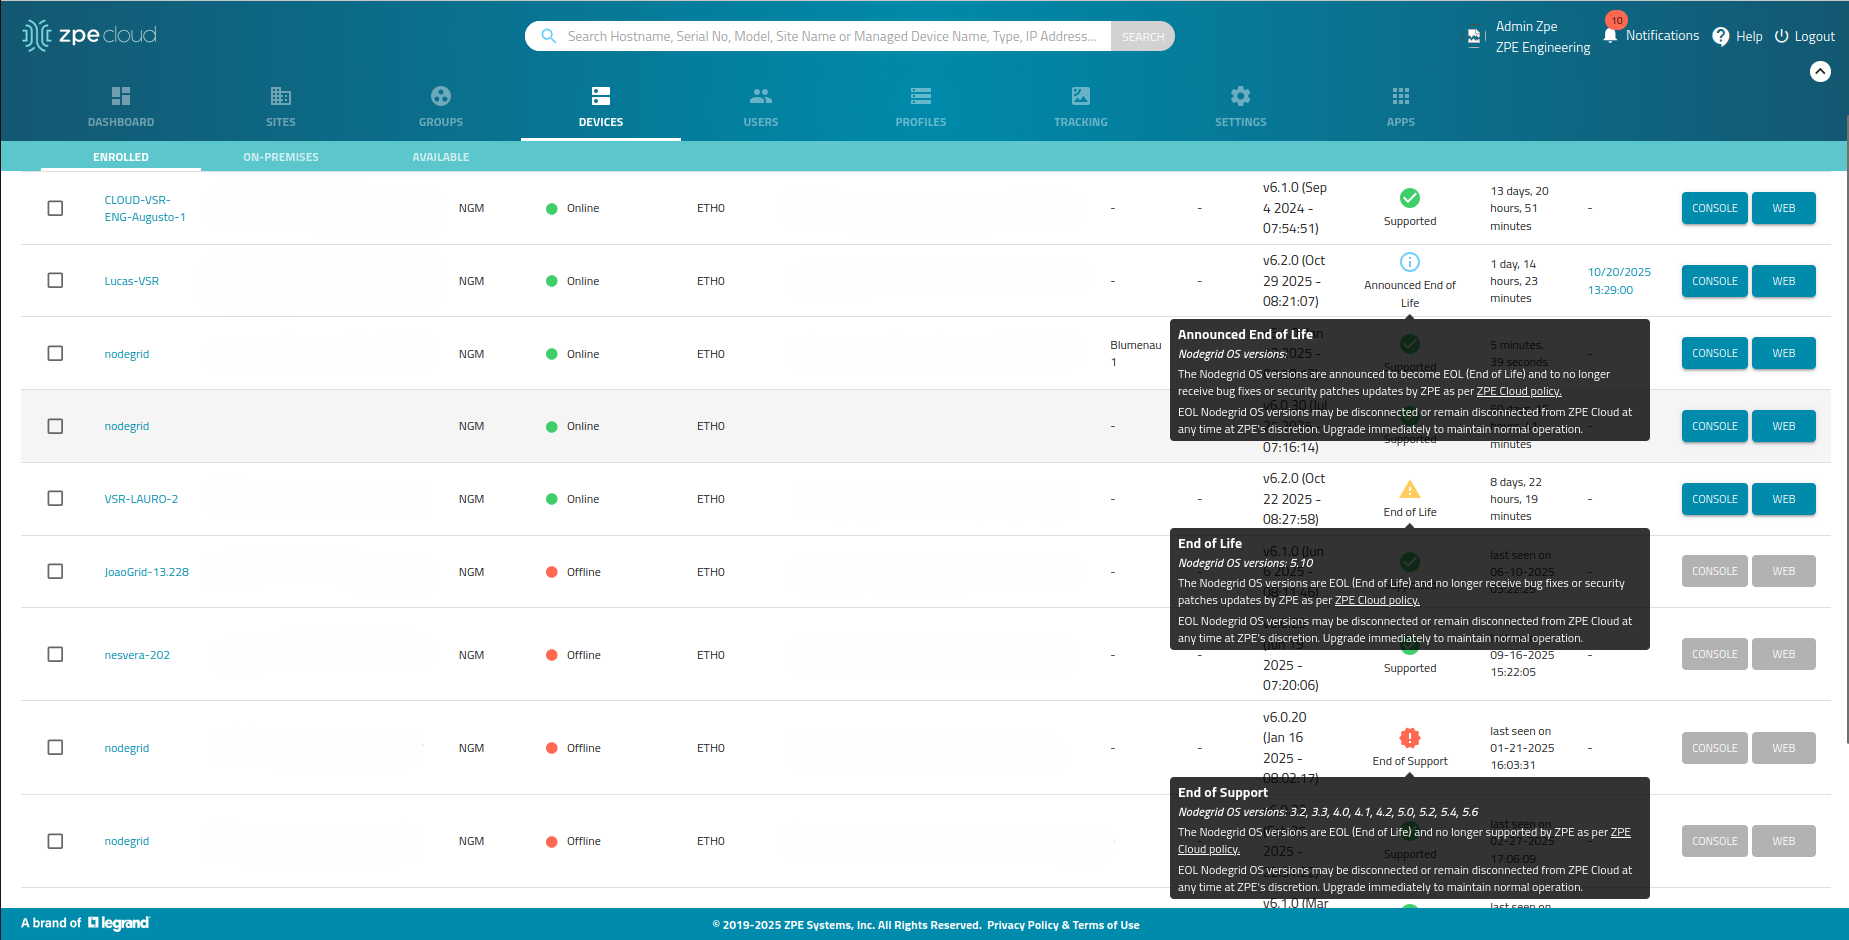
Supported
Announced End of Life - The Nodegrid OS versions are announced to become EOL (End of Life) and to no longer receive bug fixes or security patches updates by ZPE as per ZPE Cloud policy.
End of Life: Nodegrid OS versions: 5.10
The Nodegrid OS versions are EOL (End of Life) and no longer receive bug fixes or security patches updates by ZPE as per ZPE Cloud policy.
EOL Nodegrid OS versions may be disconnected or remain disconnected from ZPE Cloud at any time at ZPE's discretion. Upgrade immediately to maintain normal operation.
End of Support: Nodegrid OS versions: 3.2, 3.3, 4.0, 4.1, 4.2, 5.0, 5.2, 5.4, 5.6
The Nodegrid OS versions are EOL (End of Life) and no longer supported by ZPE as per ZPE Cloud policy.
EOL Nodegrid OS versions may be disconnected or remain disconnected from ZPE Cloud at any time at ZPE's discretion. Upgrade immediately to maintain normal operation.
Device compliance can be filtered to have a better view of the status of the devices.
Log into ZPE Cloud as a user admin or operator
Go to the DEVICES::ENROLLED page
On the OS Compliance column, click on the drop-down menu
Select the status to be filtered
.png)
Device compliance is also easily identified through the icons.
.png)
Device Status
Online - The device is connected to ZPE Cloud.
Offline - The device is not connected to ZPE Cloud.
Never Connected - The device is not connected to ZPE Cloud and has never connected.
Failover - The device is connected to ZPE Cloud, but it is using the “backup” interface from the failover.
Pending Connection - The device is not connected and has never connected. This status applies to devices in Europe.
NOTE
Device status is updated at regular intervals.
If a device is Offline, Never connected or Pending Connection, refer to the Firewall article in our KB.
Device Operations when using Cellular Connection
Alert
When operations are initiated while the device is connected to ZPE Cloud via a cellular connection, it may result in increased data consumption, data outage, reduced stability, or longer execution times. Such operations include Apply Profile, Backup, Backup Restore, Software Upgrade, Cellular Upgrade and Apply Package.
To easily identify these instances, a pop-up message will be displayed to inform the user and give the option to continue or cancel the operation.
Manage Enrollment
Apply Configuration
Go to DEVICES :: ENROLLED.
In the table, locate the device and select the checkbox.
Click APPLY CONFIGURATION (displays dialog).
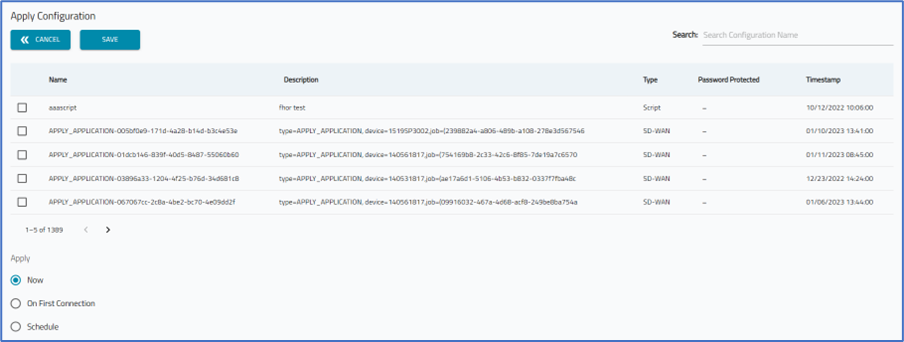
Locate the configuration (one or more) and select the checkbox(es).
In the Apply menu, select when the configuration is applied.

Now radio button (when saved, the operation executes immediately)
On the First Connection radio button (execute operation the first time the device(s) comes online)
Schedule (if selected, choose a date to execute the operation)
Recurrent (if selected, how often the operation is executed: hourly, daily, weekly, monthly). Choose from the Every Date drop-down.
Click SAVE.
Software Upgrade
Go to DEVICES :: ENROLLED.
In the table, locate the device(s) and select the checkbox.
Click SOFTWARE UPGRADE (displays dialog).
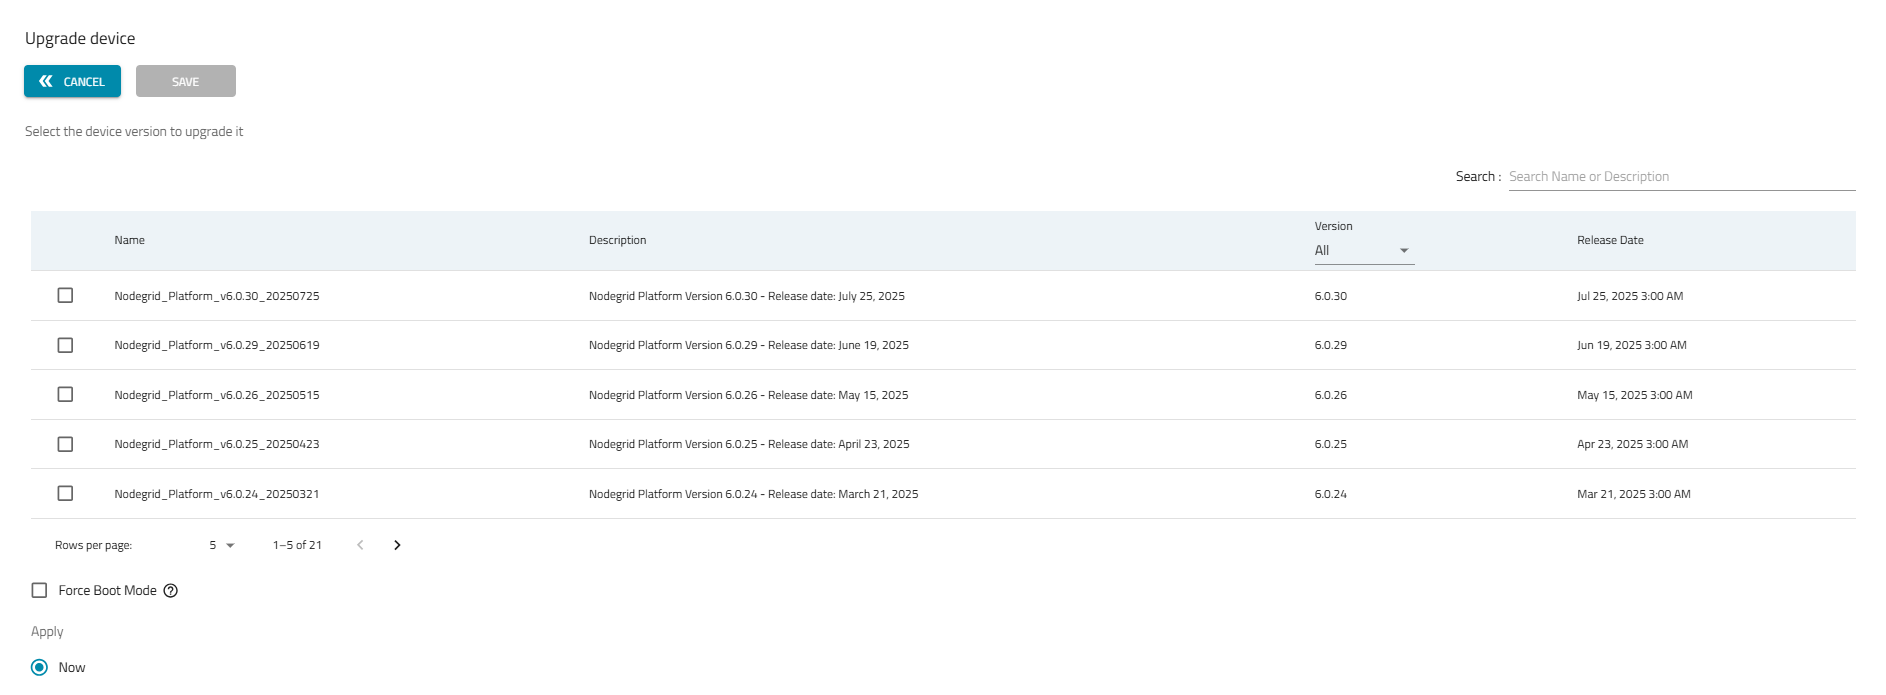
Locate the version and select the checkbox. If needed, use the Search function.
When you select a version lower than the current version a warning is displayed on the system to alert the user about the downgrade.
For Nodegrid version below 6.0.10: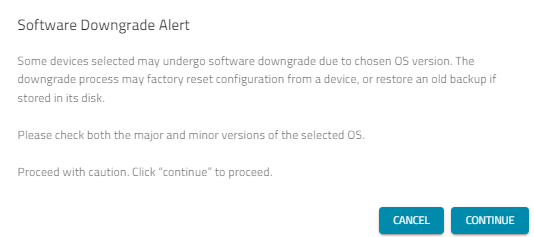
For Nodegrid versions 6.0.10 and above:
CAUTION:
If you downgrade your Nodegrid device (running versions 6.0.10 or above) to a version below 6.0.10 and if the device is enrolled in a non-US ZPE Cloud instance, such as the EU ZPE Cloud instance, the device will lose its access to the ZPE Cloud. Therefore, you must unenroll the device from the ZPE Cloud and reenroll it to restore its access to the ZPE Cloud. For detailed steps, refer to Unenrolling the Nodegrid Device During Downgrade.
.png)
Click Continue.
The device is downgraded to the selected version. You can view the updated version of the selected device on the Enrolled tab.
(optional) Select the Force Boot Mode checkbox (hover over the
 icon for information).
In the Apply menu, select one:

Now radio button (when saved, the operation executes immediately)
On First Connection radio button (execute operation the first time the device(s) comes online)
Schedule (if selected, choose a date to execute the operation)
Recurrent (if selected, how often the operation is executed: hourly, daily, weekly, monthly). Choose from the Every Date drop-down.
Click SAVE.
Warning
Software Upgrade will upgrade the firmware from the Nodegrid device, which will cause the unit to reboot.
Software Upgrade to the current Version is Not Permitted
Software upgrade to a Nodegrid OS version that matches the device’s current version is not possible and the UI will display a banner informing the user of the error.
It is also possible to verify the motive the job failed on the PROFILES::OPERATIONS::JOBS page, selecting the software upgrade job to view the operation details.
The operation details will inform the user the device is already running the selected NG OS version and therefore cannot complete the job.
Note
Devices connected to ZPE Cloud through GSM / LTE or weak connections are not recommended to receive profiles greater than 500MB, including software upgrades (around 700MB to 1.7GB), as it might affect your Data Usage plan and the connection might be reset in the middle of the download, causing the Job of the Profile to fail.
Unenrolling the Nodegrid Device Before Downgrade
Follow these steps to unenroll the device and downgrade the device to a version lower than 6.0.10. Before performing these steps make sure that you have direct access to the Nodegrid device:
Log in to the ZPE Cloud Web UI.
Go to Devices :: Enrolled.
In the table, locate the device you want to unenroll and select the checkbox(es).
Click MENU (expands dialog).
On the left panel, click MOVE TO AVAILABLE.
Click Move to confirm unenrolling the device. The selected device is moved to the AVAILABLE tab.
Click AVAILABLE.
In the table, locate the device and select the checkbox(es).
Click Remove.
Type confirmation text.
Click OK.
Access the device via the terminal as root.
Execute the following command to unenroll your device from ZPE Cloud. You must perform this step to ensure that the complete instance of your Nodegrid device is removed from the ZPE Cloud. If you have any queries while performing this step, contact support@zpesystems.com.
zpe_cloud_enroll -u https://zpecloud.eu --realm zpe --enroll-cleanDowngrade the device to the older version.
Note:
After you remove your device from ZPE Cloud you will no longer be able to access the device via Cloud. To downgrade, access the Nodegrid device via the terminal or the Web UI and follow the downgrade process. Refer to the section Software Upgrade Tool for downgrade steps.
Execute the following step to enroll the device back into the ZPE Cloud:
CLIzpe_cloud_enroll -c <customer-code> -k <enrollment-key> -u https://zpecloud.eu --realm zpe
Web UI
In the Nodegrid Web UI, under System::Toolkit::Cloud enrollment, set customer code, enrollment key and URL and click Enroll.
Backup Device
NOTE
The Backup operation requires Nodegrid version 4.1.9 or higher. The Cellular upgrade operation requires version 4.2 or higher.
Go to DEVICES :: ENROLLED.
In the table, locate the device(s) and select the checkbox(es).
Click BACKUP (displays dialog).
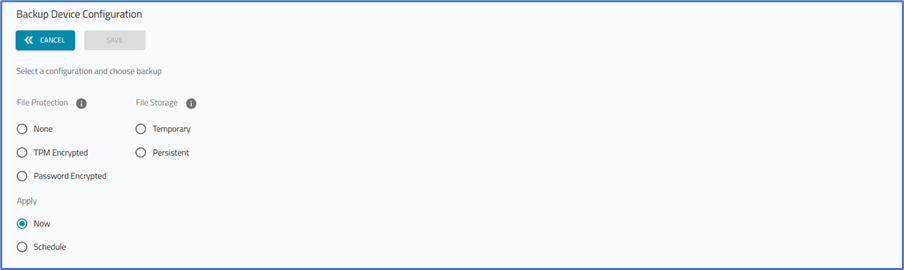
On the File Protection menu, select one:
None radio button (without encryption – backup file sent to ZPE Cloud without encryption. File can be downloaded and applied to a device through Nodegrid Manager.)
TPM Encrypted radio button (TPM encrypted file (backup file is encrypted and sent to ZPE Cloud. File can only be decrypted with the same hardware that encrypted it.)
Password encrypted radio button (backup file is sent to ZPE Cloud encrypted – saved on Nodegrid device under ZPE CLOUD SETTINGS :: ENABLE FILE PROTECTION with OpenSSL. Password must be known to decrypt the backup file when downloaded from ZPE Cloud.)
On the File Storage menu, select one.
NOTE
On ZPE Cloud, each device may have a maximum of five backups. At that limit, one or more backups must be deleted. There are two storage options available:
Temporary radio button (on a new backup request with five backups slots filled, the oldest backup is deleted)
Persistent radio button (when backup slots are full, the user must manually select the backup to delete)
In the Apply menu, select one:

Now radio button (when saved, operation executes immediately)
Schedule (if selected, choose a date to execute the operation)
Recurrent (if selected, how often the operation is executed: hourly, daily, weekly, monthly). Choose from the Every Date drop-down.
Click SAVE.
Backup Storage Limit
Every Nodegrid device is allowed to 5 backups persistent stored on ZPE Cloud. After the 5th backup is stored persistently, any new Backup request is rejected, being temporary or persistent. On the 5th Backup, if at least one of the stored backups is Temporary, the new Backup will delete the oldest Temporary Backup stored and become stored in its place, rotating the Temporary Backups.
ZPE Cloud Extended Storage app expands ZPE Cloud storage capabilities for Nodegrid devices with different subcriptions for Storage size, Download and Upload rates. It is useful to expand the Nodegrid device persistent storage limit to store any number of Backups that fits the choosen storage subscription on ZPE Cloud.
Backup Daily Limits
Every Nodegrid device is allowed to 10 backups daily performed. The limit resets everyday at 00:00 UTC. It can represent at customer choice, 10 recurrent scheduled Backups that executed on a day, or 10 scheduled/apply now Backups or a mix total of 10 recurrent scheduled or scheduled/apply now Backups that were performed that day.
Also, note, the Backup Daily limit is not cumulative, this way, 8 backups executed in a day, will not allow 12 backups to be executed on the next day. Once the limit is reached, requests for new Backups will result in the following error message: “Backup daily limit reached (10). Limit resets everyday at next 00:00 UTC“. For recurrent scheduled Backups, new Jobs generated to execute the schedule will fail automatically and the error message will be available at Job History under Profiles::Operations::<Job> page.
Scheduled Backup Limits
Every Nodegrid device is allowed to maximum of 10 scheduled Backups registered. It can represent at customer choice, 10 recurrent scheduled Backups, or 10 scheduled Backups or a mix total of 10 recurrent scheduled or scheduled Backups.
Once the limit is reached, the creation of a new Recurrent Backup will fail with an error message per Nodegrid device that reached the limit: “Device <hostname> <serial number> reached the maximum number of Recurrent schedules (10)”, in which, hostname and serial number will mention the Nodegrid devices that reached the limit and Nodegrid devices that did not reach the limit will successfully add new scheduled Backups.
Cellular Upgrade
Go to DEVICES :: ENROLLED.
In the table, locate the device(s) and select the checkbox(es).
Click MENU (expands dialog).
On the left panel, click CELLULAR UPGRADE (displays dialog).
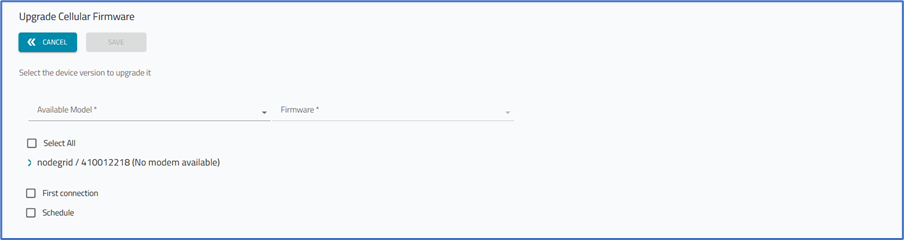
Available Model drop-down, select one.
Firmware drop-down, select one. (as needed) If the Select All checkbox is selected, all cellular units are upgraded. Alternatively, select one version on the device drop-down.
If the First connection checkbox is selected, the upgrade occurs when the device next connects to the Cloud (Schedule is disabled). If the Schedule checkbox is selected, select the date/time on the pop-up calendar.
Click SAVE.
CAUTION
Cellular Upgrade will upgrade the firmware from the Wireless Modem inside the Nodegrid, what will cause the Modem to reboot. If the Network connection used to connect to ZPE Cloud is the one provided by the Wireless Modem, the Nodegrid will disconnect from ZPE Cloud and connect back once the Cellular connection is back and ready.
Move to Available
Go to DEVICES :: ENROLLED.
In the table, locate the device(s) and select the checkbox(es).
Click MENU (expands dialog).

On the left panel, click MOVE TO AVAILABLE.
Click Move to confirm unenrolling the device.
The selected device is moved to the AVAILABLE tab.
Apply Custom Command to Device
Go to DEVICES :: ENROLLED.
In the table, locate the device(s) and select the checkbox(es).
Click MENU (expands dialog).
.png)
Select checkbox(es) of devices.
In the left column, locate and click the Custom Command to apply to selected devices.
To check the job status, go to PROFILES :: OPERATION :: JOBS. In the Hostname column, locate the device.
Apply Package to Device
NOTE
This applies only to Nodegrid v5.10+ devices.
Go to DEVICES :: ENROLLED.
In the table, locate the device(s) and select the checkbox(es).
Click APPLY PACKAGE (opens dialog).
On the table, locate the Package to be applied, and select the checkbox.
(if applicable) Select the Force Apply/Unapply checkbox.
NOTE
If selected, the package will be applied, regardless of the package version level.
In Apply menu, select when the action is applied.
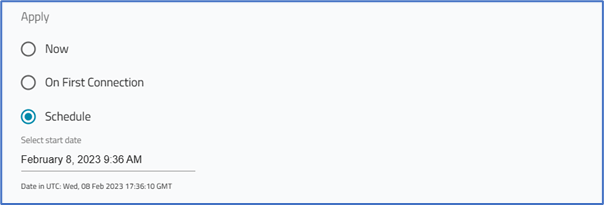
Now (when saved, execute the operation immediately)
On First Connection (execute operation the first time the device(s) comes online)
Schedule (if selected, choose a date to execute the operation)
Click SAVE.
Manage Individual Devices
When you click any of the devices listed on the Enrolled tab, all the required information related to the device is displayed on this page. If the selected device is allowed to be accessed by ZPE Cloud, the CONSOLE, WEB, and RESYNC buttons are activated as shown in the following image:

CONSOLE: Allows the user to access the device through CLI
WEB: Allows the user to access the device using the GUI
RESYNC: Allows syncing data every 15 minutes
EXPAND ALL: Expands all the sections displayed under every drop-down
RELOAD: Refreshes the page
Device Information
In the Device information section, you can view the following details:
Hostname: The hostname of the device
Connection Name: The name of the network interface port that connects the device to the network
IPv4 Address: The IPv4 address of the device used to identify
IPv6 Address: The IPv6 address of the device used to identify
Status: Shows if the device is offline or online
Last Connection: Indicates the time when the device was connected last time
Uptime*: Indicates the average operational time of the device
Last Job Name: The name of the last job run on the device. If you click the job name, you can view the information related to that particular job.
Part number: The part number of the device
Serial number: The serial number of the device
Version: The version of the Nodegrid device. A warning message is indicated next to the version number if you are using an unsupported version. Unsupported versions include v4.2 or earlier, and 5.10.1. In such a case it is recommended to upgrade to a supported version.
It is possible use the single time range selector (Start date, End date) to search for information within the selected time frame. Enter the start date and end date and click CONFIRM. All sections with time range information are refreshed.
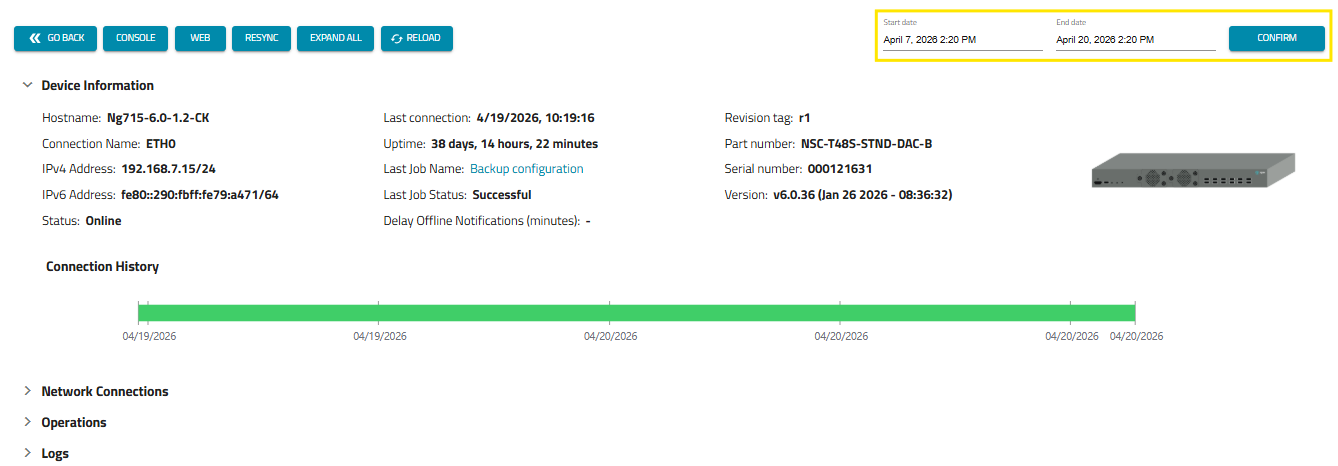
Additionally, this page contains a Connection History graph. This graph is a visual representation of the availability of the device for a selected period.
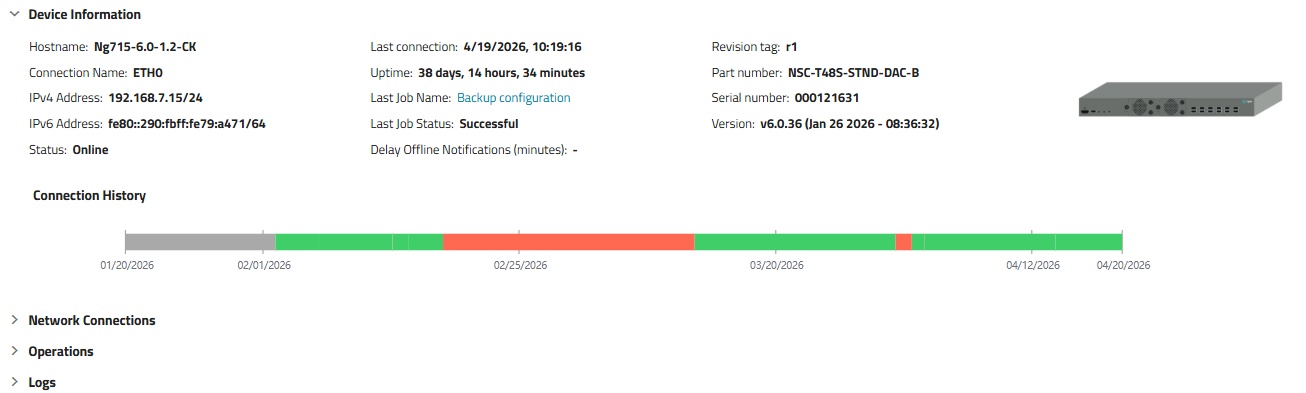
* The Green color indicates that the device was available or online for that duration
* The Grey color indicates that there is no information available for the device.
* The Red color indicates that the device was offline for a given period.
* The Yellow color indicates failover
Network Connections
You can view the network-related information such as the name of the network interface, the type of the port, the status of the device, the IP address of the device, and the MAC address of the device.
Mobile Connection Details
This section is populated only when the SIM card is available for the device. The section displays SIM card-related details such as the Connection Name, Network Interface, IMEI number, shows if the SIM card is active or not, the mobile phone associated with the SIM card, and a subscriber ID.
It is possible to view a graph on this page that shows the data usage patterns in gigabytes, the strength of the signal, and the renewal day details. You can unselect any of the fields to not include them in the graph. Just click any of the fields to unselect or select them to make part of the graph.


If there is more than one SIM card available, the information is displayed under the active SIM cards only.
Operations
This section provides a summary of all the jobs that were run on the device.
You can view the job ID, job name, type, application associated with the job, the date and time of the creation of the job, and the date and time when the job was finished.
You can click SEE MORE to get more insights on the listed jobs. When you click the JOB ID, the job details are populated.
Jobs are usually created to upload configuration or run a script and so on. On this page, you can view the type of configuration uploaded, the name of the configuration, the registration, the time when the job was finished, the status of the job, hostname, serial number, and model number of the device.
Logs
The Events section lists any events such as device outage, or system failover caused to the device.
Slots
This section lists all the devices attached to the selected devices.
For example, if you select a Nodegrid NSR device and it has other devices attached to it, this section lists the slot number where the device is attached, the part number of the device, the type of the device attached, and any add-ons for the device.